Dynamic Views
Dynamic views are a way of consulting different information in tables for different products, with filters and visualization in different ways, such as reports that allow printing in CSV, PDF or another existing format. This report can be sent via email, as long as the email server is configured.
For products in which the resource is available, it is necessary to obtain the metadata structure, which are the definitions of tables and fields that the base has, the list of tables, which fields exist in each of them, what type of data the each of them, among other information. Based on this information, queries are generated.
For each query, there is a time of 4 (minutes) for viewing and generating reports, after this time, the actions are aborted based on a routinetime out, which stops the query process.
Dynamic views and reports that take more than 1 (hour) to be processed will have their generation automatically cancelled, returning a notification to the user.
Important
Metadata synchronization must be done whenever there are changes to the base definition, for example, the creation of new tables.
Adequately control the volume of reports and dynamic views issued, through the information displayed on the screen: amount of data transmitted, customized requests that were made, time spent on customizations and quota limit. If any of these limits are reached, a warning message will be displayed. To expand limits, contact Senior.
What can you do:
- Access Technology > Customization > Reports > Dynamic Views;
- click inNew Vision;
- Inform theName,Description It isTags to identify this dynamic view and clickVisual editor for settings;
- Then select in the fieldTable one or more tables that will be used to create the dynamic view. If more than one table is selected,Connections inform which fields are responsible for theJoin in dynamic view;
- If desired, use the other fields to the right of the chosen table to filter and personalize the information displayed, defining grouping and ordering, for example;
- Optionally, use the buttonTo view to see a preview of the information on screen (up to 10 lines of data are shown in the preview) or in View in PDFto understand the visualization of such data on file;
- To generate a file report with all results, clickGenerate report and then set theFormat It isShipping of the file (by email as an attachment or as a link). click inConfirm;
- click inSave view so that it is saved and can be used again. This way, when you go back to Technology > Customization > Dynamic Views, the saved view is shown.
- Access Technology > Customization > Reports > Dynamic Views;
- click inNew Vision;
- Inform theName,Description It isTags to identify this dynamic view and clickSQL Editor for configurations and then build the SQL as needed;
- Optionally, use the buttonTo view to see a preview of the information on screen (up to 10 lines of data are shown in the preview) or in View in PDF to understand the visualization of such data on file;
- To generate a file report with all results, clickGenerate report and set theFormat It isShipping of the file (by email as an attachment or as a link). After that, clickConfirm;
- click inSave view so that it is saved and can be used again. This way, when you go back to Technology > Customization > Dynamic Views, the saved view is shown.
When using comments in this dynamic view mode, use between characters/* */.
Example:/* MY COMMENT */ .
After creating a dynamic view, all information available in the selected table is available. However, it is possible to choose which information is displayed and change the way it is presented, using the grouping, adding functions, hiding, changing position, ordering and filtering features of the table fields, except for custom fields:
- Under Grouped by, clickAdd a + grouping
to define by which field the information should be grouped; - click inTo view to update the data displayed in the view according to the filter;
- If you don't want to keep the filter, you need to click on theX next to it and click againTo view to update the information.
The display order of the columns will be the same as that defined for the grouping. If you assemble the view and then want to reorder the groupings, all other functions of the view will be lost, as they depend on what is in those first ones.
In order to provide a refinement of the displayed data, dynamic views support the use of common SQL expressions, such as COUNT(), SUM() and MAX():
- Under Roles, clickPure data +. When there is no expression configured, the value of this field is maintained;
- Select an available expression and then determine the field on which it should be executed;
- click inTo view to update the data displayed in the view according to the filter;
- If you don't want to keep the filter, you need to click on theX next to it and click againTo view to update the information.
This expression will be available in the last column of the dynamic view and in the report.
When you do not choose to group fields or functions, you can select which columns will be displayed in the query and the order in which they will be displayed.
- click inAll to open a window with all available fields for the selected table;
- Leave those that you want to view marked and those that should not be shown as columns in your dynamic view unmarked;
- To sort, reposition the fields by clicking and dragging them to the desired location;
- click inConcluded to apply the changes;
- click inTo view again to update the data displayed in the view according to the filter;
- If you do not want to keep the fields as configured, repeat steps 1 to 4.
Custom fields are presented with an indicative icon in the column, in order to identify them within a dynamic view.
By not choosing to group any column, it is possible to sort by any column that is marked for viewing.
- click inConfigure ordering +
to define by which field the information should be sorted; - click inTo view to update the data displayed in the view according to the filter;
- If you don't want to keep the filter, you need to click on theX next to it and click againTo view to update the information.
Observation
By default, sorting is performed in Ascending order (from smallest to largest value). If you want to reverse this order, click on the wordasc next to the desired field, to display the menu with the ordering direction.
The data is only filtered in the view after this configuration. Otherwise, they are all displayed.
- click inAdd filters + to filter the information displayed according to any of the table fields;
- A list is displayed with all the fields in the table, and next to one there is an icon identifying its type: string, numeric, date or boolean. Each has different filter options;
- After choosing the field, define how it is filtered and, depending on what is chosen, enter a value and clickAdd filter;
- So that parameters are informed when executing the dynamic view, select the optionParameter and determine that this filter is a parameter. Then enter the parameter name and clickAdd filter;
- click inTo view to update the data displayed in the view according to the filter;
- If you don't want to keep the filter, you need to click on theX next to it and click againTo view to update the information.
The time zone setting (timezone) when executing Dynamic Views and/or Reports, it occurs as follows:
- Default setting: for timestamp type fields, by default, when executing Dynamic Views and/or Reports, the timezone of the user's browser is applied, sent through the headerx-user-timezone-offset.
- Manual configuration (timezone entered manually): because some products store this information using the timezone application and others use UTC-0, when viewing, the information ends up showing divergences. To prevent this from happening, simply configure the timezone manually using the field and thus overwrite the default configuration. Through the fieldReport manual timezone
- determine:
After creating dynamic views, other actions can be performed:
Go to Technology > Customization > Reports > Dynamic Views. Click on the desired dynamic view and, to see it, on theDetails, at the top of the screen. After that, on the screen that shows the view, you can make changes andTo save,To view with previously saved information orDelete view.
Go to Technology > Customization > Reports > Dynamic Views. Click on the desired dynamic view and then clickDuplicate view, at the top of the screen. After that, enter a name for the new view and proceed with the steps tocreate a new dynamic vision.
- Access Technology > Customization > Reports > Dynamic Views;
- Click on the desired dynamic view and to see it on the buttonDetails, at the top of the screen;
- click inGenerate report
- and choose one of the available format
- s:printouts in reports, in PDF format, are exported in paginated form, that is, with page breaks;When exporting in CSV format, the data is exported with a header and a list of values, which can later be imported into Excel. To do this, simply access Data > Get Data from Text/CSV in the Excel file itself and choose this file to import.
ImportantBecause the systems are internationalizable, data is exported in UTF-8 format. Therefore, when importing data into Excel, it is recommended to change thehidden to UTF-8.
- Choose the sending method, which can be via notification, email with an attachment or email with a link. If the chosen option is notification and there is permission to view groups, you can select the check boxUsers in a group. This way, all users in the group will receive the report;
- click inConfirm.
After confirmation, a notification will be displayed on the screen informing you that the report has been generated. Once finished, a new notification will be presented with the link to view it.
To make this report available, it is necessary to enable some resources linked to the process, so that it is possible to run the report and view it.
Below are the steps to enable the report, update the database, create the report and run it.
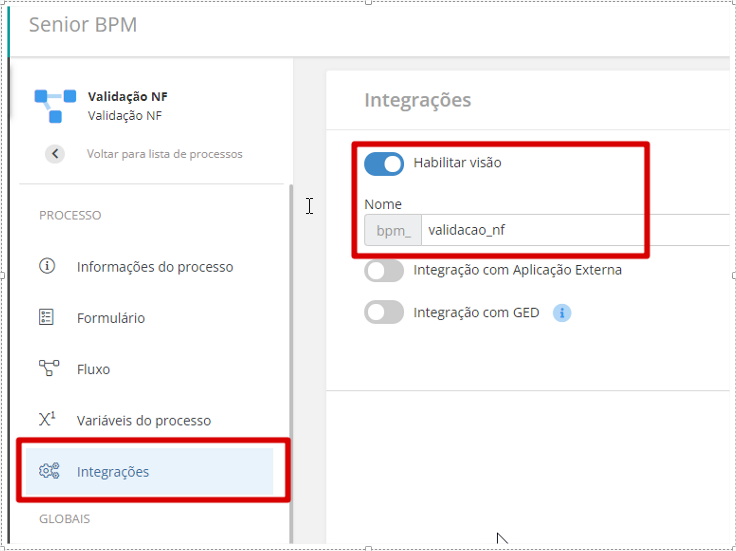
Enable vision for the process
If the process does not have the view enabled, it will not be possible to create the report for it. Perform the steps below:
- Access the Senior X Platform with the process administrator user;
- Access the menuSenior X > BPM > Processes;
- Find the process you want to create the report for and click"Actions > Edit";
- On the process edit screen, click on the option"integrations";
- Enable the field"Enable vision" and include a name for the dynamic view of this process;
- Click on the button"To save" to record the information.
Report database update
Whenever there are changes in the definition of the reporting base, it is necessary to synchronize the metadata so that the resource is available in your Tenant along with the tables, fields and metadata structure.
To do this, perform the steps below:
- Access the Platform with an administrator user;
- Access the menuTechnology > Administration > Reporting Database > Enable Reporting;
- Scroll to the bottom of the screen, and click the button"Update database";
- The update process can take a long time. Wait until complete completion.
Report creation
As the objective of the report is to have feedback informing the status of each of the requests in the process, below is how this status is stored in the platform's database.
Status = 11 When the process request is already 'Closed' or 'handled'
Status = 4 When the process request is 'Cancelled'
Status = 1 When the process request is 'Pending' or 'In Progress', awaiting approval action.
- Access the menuTechnology > Customization > Reports > Dynamic View;
- Click on the button"New Vision";
- Enter a name and description for your report;
- Click on the option"SQL Editor".
Select
case
when A.status=1 Then 'In Progress'
when A.status=11 Then 'Closed'
when A.status=4 Then 'Canceled'
End as Status,
A.process_instance_id as Request,
A.start_date as Data_Start,
A.end_date as End_Data,
A.responsible as Responsible
From "platform-workflow".<process_name_bpm> As A
Observation
process_name_bpm is the name defined for the view in step one.
- Then click the button"To save" to save your report;
- To view a preview of the report you can click the button"To view";
- To generate a complete report, click the button"Generate report".
You can also schedule an automatic periodic run of this report by clicking the button"Schedule execution". Simply select the report format and the number of days it should be available.
When you click to confirm, you will be directed to the Scheduling Details screen. In session"Execution", you must inform when the report should be started, and the time it will be generated. If you want the report to be run more than once, select the option"Repeat" and configure the frequency.
It is possible to place parameters to execute the dynamic view, to inform the parameter it is necessary to follow a specific pattern(${"platform-social".profiles_total_engagement.total_engagement : total}).
Meaning of each item:
- "platform-social": Domain and service responsible for the table;
- profiles_total_engagement: View that the parameter is being applied;
- total_engagement: Field that should be compared to the value entered;
- :total: Name of the parameter that should appear to the user when filling it out.
To schedule a report, you must have permission to schedule features. Then:
- Access Technology > Customization > Reports > Dynamic Views;
- Create a new dynamic view or edit an existing one;
- Click on the buttonSchedule execution;
- If the report has parameters, they must be filled in. Enter the format and who to send it to. The user will be redirected to the scheduling screen, where all the fields required for the report will already be filled in;
- Complete the sectionExecution, choosing the start date, frequency, time, among others.
Note
- All schedules will be created containing the name of the report or dynamic view being edited. If the dynamic view or report changes its name, the schedule continues with the old name and it will be necessary to update the name as well.
- To use this functionality, you must have permission on the Edit/Change action, on the res://senior.com.br/platform/scheduler/job resource.
Attach the dynamic view to a menu item so another collaborator or user can print or view it:
- Access Technology > Customization > Reports > Dynamic Views;
- Select the dynamic view for which the menu will be created;
- click inDetails;
- In the Dynamic View Menus section, clickNew;
- InLabel, enter the name of this menu;
- Select a menu in which it will be presented:
- I
- n the main menu: allows you to select only grouping menus. Example: Technology > Customization > My vision;In the context of a screen: it is not possible to select menus that are groups of submenus. Example: Technology > Customization > Modules > My vision;
- When it is not possible to select one of the menus from the previously determined location, an access denied icon will be displayed.
- click inTo add and then,To save.
Important
In addition to making the menu available, you must ask the administrator for permission to view the Custom > Dynamicviews > View_Name resource for the user in question.
Permissions
After creating and defining dynamic views, it is possible to customize access and control of resources that each user can have through their roles. All views are created within the Custom domain, which has a service called Dynamic Views and all existing views listed in it.
By default, only the administrator user can have access to dynamic views. However, it is possible to grant some permissions to other users.
- Access Technology > Administration > Authorization > Paper Management;
- Access the desired role or create a new role;
- Associate the users with whom you want to share dynamic views to the role;
- In Role Permissions, in the Custom domain, expand the DYNAMICVIEWS service and for each of the desired views select the optionTo view;
- Still in Role Permissions, now in the Platform domain, expand the REPORT_DATABASE service and select the optionTo view for Metadata.
- click inTo save at the bottom of the screen.
- Access Technology > Administration > Authorization > Paper Management;
- Access the desired role or create a new role;
- Associate the users with whom you want to share dynamic views to the role;
- In Role Permissions, in the Custom domain, expand the DYNAMICVIEWS service and for each of the desired views select the optionTo alter and/orTo view;
- Still in Role Permissions, now in the Platform domain, expand the REPORT_DATABASE service and select the optionTo view for Metadata and Database for reports. In the DynamicViews service domain, check the same option for Dynamic Views;
- click inTo save at the bottom of the screen.
- Access Technology > Administration > Authorization > Paper Management;
- Access the desired role or create a new role;
- Associate the users with whom you want to share dynamic views to the role;
- In Role Permissions, in the Custom domain, expand the Report_database_metadata service and select the option toTo view for the chosen table;
- Still in Role Permissions, now in the Platform domain, expand the REPORT_DATABASE service and select the optionTo view for Metadata and Database for reports. In the DynamicViews service domain, check the same option for Dynamic Views;
- click inTo save at the bottom of the screen.
- Access Technology > Administration > Authorization > Paper Management;
- Access the desired role or create a new role;
- Associate the users with whom you want to share dynamic views to the role;
- In Role Permissions, in the Custom domain, expand the Report_database_metadata service and select the option toTo view for the chosen table. For the Dynamicviews service, select the same option for the chosen dynamic view;
- Still in Role Permissions, now in the Platform domain, expand the REPORT_DATABASE service and select the optionTo view for Metadata and Database for reports. In the DynamicViews service domain, check the same option for Dynamic Views;
- click inTo save at the bottom of the screen.
- Access Technology > Administration > Authorization > Paper Management;
- Access the desired role or create a new role;
- Associate the users with whom you want to share dynamic views to the role;
- In Role Permissions, in the Custom domain, expand the Report_database_metadata service and select the option toTo view for the chosen table;
- Still in Role Permissions, now in the Platform domain, expand the REPORT_DATABASE service and select the optionTo view for Metadata and Database for reports. In the DynamicViews service domain, select the optionTo view It isTo editfor Dynamic Visions;
- click inTo save at the bottom of the screen.
Permissions scenarios
Check the configuration for some permissions to dynamic view tables:
- Access Technology > Administration > Authorization > Paper Management;
- Choose the role of the user who will have this access permission to the tables;
- In Role Permissions, in the Custom domain, expand the REPORT-DATABASE-METADATA service;
- Choose the resources this role will allow;
- click inTo save;
- Access this user's role again;
- Search for PLATFORM permission and expand the DYNAMICVIEWS service;
- In the Dynamic Views feature, selectTo alter It isTo view;
- click inTo save.
After this, the user will be allowed to access the dynamic views menu and create a table in the database.
The permission to issue a report must be used when the user needs to associate the dynamic view with a menu item during its creation.
Therefore, with this permission, this view will be available to any user who wishes to print this report. For example, in the case of a manager who created the report, asking his subordinate to print it, who does not have permission to create dynamic views or access the tables.
For that:
- Access Technology > Administration > Authorization > Paper Management;
- Choose the role of the user who will have this permission;
- In Role Permissions, in the Custom domain, expand the DYNAMICVIEWS service;
- Select the created view and select the option toTo view;
- click inTo save.
After that, all users with permissions for this dynamic view will be able to view it in the menu and generate their report.
Important
In some cases, the user responsible for creating the dynamic view does not have permission to provide permissions to other users. Therefore, it is necessary to ask the administrator.


