Implantation
Senior X Platform Integrator deployment process.
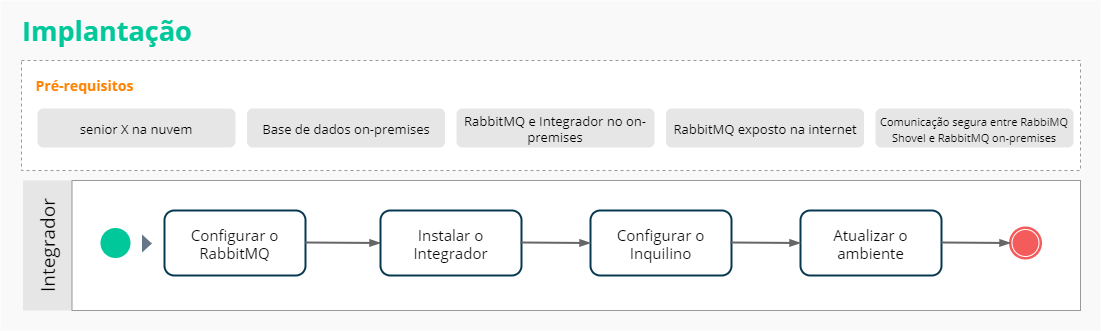
The flow shown in the image is the standard implementation process, but it can be carried out in different ways, such asinstalling the integrator with scripts orupdating the environment manually.
What do you need to do:
Change some settings of the already installed RabbitMQ and prepare it for use by the Integrator, which consists of: activating the RabbitMQ web manager, configuring the AMQP/AMQPS and HTTP/HTTPS ports, in addition to the respective digital certificates, and creating a virtual host for the tenant (for multi-tenant environment):
- Access the server where RabbitMQ is installed. Necessary step as the Installer will use RabbitMQ line commands to configure;
- Run the Installer from the system shared folder. For example, \\server\sapiens\SeniorInstaller.exe;The Senior System Installer must be run under the same operating system user as the RabbitMQ process is running.
I
mportant
- Under Installation type, select the optionStation and clickAdvance;
- Proceed with the other mandatory Installer steps until you reach the Product Selection step;
- In Product selection selectTools and the subitemG7 Integrator and clickAdvance;
- Proceed with the other mandatory Installer steps until you reach the G7 Platform stage;
- In G7 Platform select the optionRabbitMQ and clickAdvance;
- In Parameters, enter:
- Product: inform the product in which the Integrator will access the data;
- Tenant name: enter the name of the customer registered in the G7 cloud. Typically this information is provided by Senior's IT services team;
- Type of environment: inform single-tenant only if this server and RabbitMQ will be used for only one client. Otherwise, report multi-tenant.
click inAdvance;
- In RabbitMQ enter:
- RabbitMQ Service: select the Windows service responsible for RabbitMQ;
- RabbitMQ installation directory : enter the path to the folder where RabbitMQ is installed;AMQP port: inform the port on which RabbitMQ listens via the AMQP protocol. Default: 5672
- ;HTTP/HTTPS port: enter the desired port for running the RabbitMQ manager. It is recommended to use port 15671 with SSL/TLS enabled;
- User: RabbitMQ admin user;
- Password:
- RabbitMQ administrator user password;
- Proceed with the remaining steps until the Installer steps are completed;
- Run the following command line from the bin folder where RabbitMQ is installed:C:\Program Files\RabbitMQ Server\sbin>rabbitmqctl node_health_check
. A result similar toHealth check passed
will indicate that RabbitMQ is operational and healthy.
At the end of the process, with the option toSSL/TLS selected in the RabbitMQ Installer step, upload the certificate from the certification authority through the senior X Platform and in Technology > Administration > Tenant Management > Public keys. Finally, ask Senior IT to include the certificate in Shovel Cloud.
Important
For security reasons, it is recommended that RabbitMQ and Integrator are installed on different servers. Because the RabbitMQ server will be exposed on the internet and if the Integrator is installed on this server, it will be necessary to allow access to the system's database, thus increasing the risk in cases of invasion of this server.
For user integration between the Senior systems and the senior X Platform to occur correctly, it is necessary to configure theURL for JDBC connection, in the Senior Configuration Center, in Database > Enterprise Management (ERP) or People Management, in the Java Applications section, is appropriate.
The Integrator must be installed on the same server as the base that will be replicated. This way, it will be updated automatically during a system update. If it is not on the same server, the Integrator will have to be updated manually.
- Access the server where the integrator will be installed. The server must have access to RabbitMQ via AMQP/AMQPS and the G5 database via TCP/IP;
- Run the G5 installer from the G5 system shared folder, for example, \\server\sapiens\SeniorInstaller.exe;
- Under Installation type, select the optionStation and clickAdvance;
- Proceed with the other mandatory steps until you reach the Product Selection step;
- In Product selection selectTools and the subitemG7 Integrator and clickAdvance;
- Proceed with the other mandatory steps until you reach the G7 Platform stage;
- In G7 Platform select the optionIntegrator and clickAdvance;
- In Parameters, enter:
- Product: inform the product in which the integrator will access the data;
- Tenant name: Enter the name of the customer registered in the G7 cloud. Typically this information is provided by Senior's IT services team;
- Environment type: inform single-tenant if this server is RabbitMQ; will be used for only one customer. Otherwise, report multi-tenant;
- In RabbitMQ enter:
- Server: name of the server where RabbitMQ is installed;
- AMQP port: inform the AMQP port configured in RabbitMQ
;
User: RabbitMQ admin user;Password: RabbitMQ administrator user password;click inAdvance.
- Enter the path where Java 8 is installed (see theminimum requirements for installation), and an administrator user on the G7 cloud platform, for example, admin@cliente.com.br;
- click inAdvance, and enter a network username and password which will be used to run the Integrator's Windows service;
- Verify that the Integrator Windows service has been successfully installed in the Windows service manager.
- Install the integrator as a Windows service by obtaining its latest version on FTP, in Senior > integration-backend;
- Unzip the .zip file on the machine where the installation will be carried out and check that the programApache Commons Daemon will also be in the archive;
- Edit the scriptinstall-windows-service.bat, so that the values of the settings mentioned above are adjusted according to the installation environment and execute the script;
The environment variableJAVA_HOME must be set to the value of the Java installation path. For example:C:\Program Files\Java\jdk1.8.0_131. - The Windows service for the integrator will be available:
- Name: Senior - G7 Integrat
Note
To remove this service, run the commanduninstall-windows-service.bat. In a multi-tenant environment, such as IBM Cloud, it may be necessary to edit the file to indicate the name under which the service was installed, instead of the default IntegrationBackend.
- Access the platform with the tenant administrator user;
- Go to Technology > Configuration > By Tenant and select the created tenant;
- On the Infrastructure tab, configure the following properti
- es:
- RabbitMQ on-premises HTTP URL
- : https://ip_fixo_ou_dominio_do_servidor:
- 15671RabbitMQ on-premises us
- click inTo save;
Mandatory
- BROKER_HOST: server where RabbitMQ is running;
- BROKER_PORT: RabbitMQ port;
- BROKER_USER: RabbitMQ user;
- BROKER_PASS: RabbitMQ password;
- BROKER_API_PORT: RabbitMQ REST API port (default: 15672);
- BROKER_SSL_ENABLED: enables the use of SSL in the broker (AMQPS) (default: false). Mandatory variable only if using AMQPS;
- DB_TYPE: G5 database type. Possible values: Oracle and SQLServer (there should be no space for the SQL Server type);
- DB_URL: JDBC URL to access the database (with username/password). Used if the G5_CFG_FILE property is not informed;
- G5_CFG_FILE: path to the G5 configuration file. If informed, it is used to read information from the database instead of the DB_URL property;
- TENANT: name of the tenant sending the information;
- USER: default user to send the message (usually the administrator). For example: admin@tenant.com.br;
- VIRTUAL_HOST: name of the virtual host to which the connection will be made (default: /).
Options
- REPOSITORY_TYPE: indicates which type of repository should be used to keep the files until they are consumed. Options: BlobService (default), for the blob-service and LocalFS for the local file system;
- REPOSITORY_PATH: location in the repository where the files will be copied (only for LocalFS repository - directory where the copy will be made);
- G5_PROD_NAME: G5 product for which the base configurations will be read from the file informed in G5_CFG_FILE: erp (default) or rh;
- INTERVAL: interval (in milliseconds) for monitoring changes by replication (default: 30000);
- AGE_TO_CLEAN_TABLES: age in days (default is 30 days) of records from the RTC_PENDENCIES and RTC_ERP_AWS_STATUS backlog tables that will be deleted: current date and time - operationtime (record creation date);
- TIME_VERIFY_CLEAN_TABLES: interval in hours (default is every hour) for running the task of cleaning up old records from the RTC_PENDENCIES and RTC_ERP_AWS_STATUS backlog tables;
- CLEAR_TABLES_BEFORE_INTEGRATION: marked with a value of "true" or "false" (default value) which indicates whether the feature of cleaning old records from the RTC_PENDENCIES and RTC_ERP_AWS_STATUS pending tables is executed before performing a migration;
- PAGE_SIZE: maximum number of pending issues that will be read each time (default: 10000);
- MESSAGE_PENDENCIES_SIZE: defines the maximum number of pending issues that will exist in a message sent to the cloud (default: 10000);
- MESSAGE_NUMBER_SIZE: defines the maximum size in kilobytes that a message can contain when sent to the cloud, upon reaching this value a new message will be created (default: 512);
- CHECK_RABBIT_QUEUE_SIZE: defines whether the local RabbitMQ queue should be monitored before running continuous integration (default: false);
- RABBIT_QUEUE_SIZE_THRESHOLD: Maximum size the local RabbitMQ queue can be before running continuous integration. This parameter is only used if the CHECK_RABBIT_QUEUE_SIZE parameter is set to true (default: 4000);
- DATA_REPOSITORY_REQUEST_TIMEOUT: timeout (in milliseconds) used in requests to the data repository (blob-service, jackrabbit, ...) (default: 30000);
- PROXY_HOST: name of the proxy server, in the absence of a value it is read from the G5 file (if any), otherwise it is considered that there is no proxy server;
- PROXY_PORT: proxy server port, in the absence of value it is read from the G5 file (if any) (default: 3128);
- PROXY_USER: proxy server user, if authentication exists. If there is no value, it is read from the G5 file (if any), otherwise authentication is not performed;
- PROXY_PASS: proxy server password, if authentication exists. In the absence of a value, it is read from the G5 file (if any);
- PROXY_EXCEPTIONS: list of hosts that should not go through the proxy. For example: senior.com.br. This configuration is not read from G5, so it must always be informed by environment;
- NUMBER_RECORDS_TO_CLEAN_PER_TIME: defines the maximum number of records that will be deleted in the cleaning process (default: 1000);
- DIAGNOSTIC_PORT: The default service diagnostics port is allocated by Java when starting an environment. If there is another service being started on the same machine, without this parameter informed, the service will be terminated, as the port is already in use;
- MAIN_DELAY: defines the time in milliseconds to wait between attempt cycles (default: 270000);
- RETRY_DELAY: defines the time in milliseconds to wait between attempts to restore the service (default: 5000);
- START_RETRIES: defines the maximum number of each cycle of attempts to restore the service (default: 6);
- MESSAGE_PENDENCIES_INTERVAL: limits the time, in milliseconds, that a data packet is processed (default: 60000).
- Go to Technology > Administration > Tenant Management > Services/Components and clickTo update;
- If the cloud is able to communicate with the on-premises environment, the Integration service will be presented in the On-Premises section;
- click inApply to the environment to save the configuration;
- Access Technology > Administration > Integrator > Initial Load;
- Check the backend version at the bottom of the page, indicating the version of the integrator that was installed on-premises.
The update procedure via G5 Installer is the same as detailed previously. However, in exceptional cases, it may be necessary to manually update the integrator. To do this, perform the following steps:
- Download the integrator package from FTP2;
- Extract and unzip the package (.zip) into a temporary folder and stop the Integrator Windows service;
- Access the folder where the Integrator is installed and locate the integration-xxx-assembled.jar file, generally in the Sapiens subfolder in the Senior folder;
- Rename the file to .bkp, for example, integration-3.2.2-assembled.bkp, as a backup of this file;
- Copy the .jar file from the temporary folder where the new Integrator version was obtained in FTP2, for example, integration-3.4.6-assembled.jar;
- Rename the newly copied file to exactly the name of the old file, for example, integration-3.2.2-assembled.jar.
This is necessary because the Windows service will use exactly this name that was specified during installation by the G5 installer.
- Start the Integrator Windows service again.
User synchronization consists of requesting an initial user load from the Senior solution and then enabling automatic synchronization to keep them updated. The on-premises integrator, upon receiving the import request, generates a file with user information in the system and uploads it to the cloud.
Upon receiving the file, the cloud will process it and, upon completion, notify the administrator user, providing a report with the users and groups that were imported or not.
Important
The import of users to the platform through the Integrator only takes place for G5 authentication, that is, carried out by the Senior User Manager. If the authentication defined is LDAP, ADFS or NTLM, user replication is done based on the integration settings defined on the platform.
- Access the platform with the tenant administrator user;
- Access Technology > Administration > Tenant Management > Configure;
- Select the tenant and clicksettings;
- On the authentication tab, in the fieldAuthentication type, select the "Authentication on G5" option and clickTo save;
- Go to Technology > Administration > User Management and clickG5 user onboarding;
- click inCheck connection to check that communication with the Integrator is working correctly;
- click inImport users. At the end of the process, a notification is sent to the administrator user and a report indicating success or failure in user synchronization;
- Click on the buttonImport users. At the end of the process, a notification will be sent to the administrator user and a report indicating success or failure in user synchronization. This procedure may take a few minutes to complete. If this button is disabled, go to Technology > Administration > Integrator > Replication and pause replication.
- With the user import completed successfully, clickEnable automatic sync. This will cause changes made to the system to be replicated in the cloud. The indication that synchronization was successfully enabled, but the Integrator is paused or stopped, is made via an alert (orange notification). To do this, go to Technology > Administration > Integration > Replication and clickStart
. To validate that user replication is occurring successfully, you can change the full name or description of an active user in Senior User Manager. Wait approximately one minute for the synchronization to occur and then consult the user registration in Technology > Administration > User Management and check whether the data changed in the Senior User Manager has been replicated on the senior X Platform.
Important
LDAP and SAML authentication settings may vary depending on the software used. Therefore, contact the IT Services - Consulting area to carry out the necessary configurations.
Check that the cloud and on-premises environment are able to communicate successfully by following these steps:
Run the following command linetelnet {{server}} {{port}}, for example, telnet server001 5671.
A black screen will appear and then by pressing several timesCTRL +X, a "Connection to host lost" message will be reported.
Using the browser, access the RabbitMQ web manager URL and log in. Check the Overview tab in the manager.
Access the folder where the Integrator is installed and locate the log file generated by the integrator. The log must not contain Exceptions or communication failure messages with AMQP, TCP and SQL.
Using the browser, access the web manager URL, for example, https://server:15671. Log in and then go to the Queue tab, which should list queues with the name "senior.platform.cloud.integration".


