Custom fields - Colabbe - Digital hiring
Custom fields are personalized fields that you can create and add to Colabbe's pre-hiring invitations.
With these fields, you can include in the invitation the information that your HR department needs to request from new employees and that is not present in the system's standard invitation.
This documentation explains how to create custom fields for use in the Colabbe system. For general information on the senior X Platform's custom fields feature, see the full feature documentation in the platform manual.
How to create custom fields in the Colabbe system
- Log in to the senior X Platform using an account that has administrator permissions.
- Go to the menu: Technology > Customization > Fields.
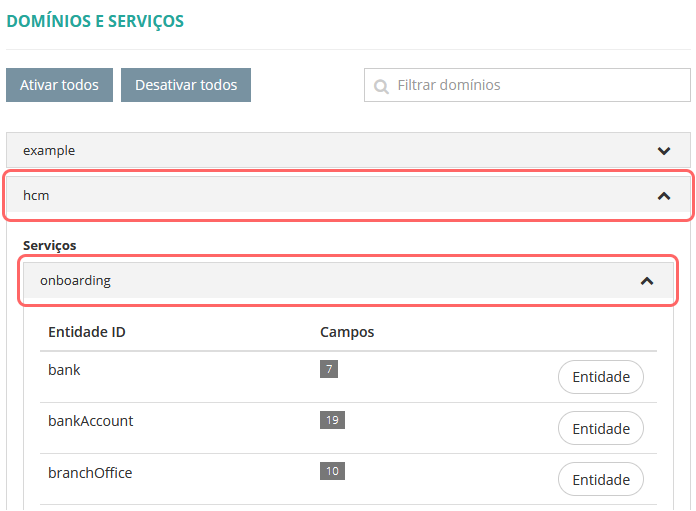
- Look for the hcm domain in the list or use the search field to find it.
- In the hcm domain, look for the onboarding service. With this service you can manage the Colabbe system's customized fields, grouped by entity. Entities represent groups of information, such as company, bankAccount, among others.
- Click on the Entity button next to the entity you want to change. You will see the screen where you can create, edit, delete or inactivate the fields related to it.
 Lista de entidades que suportam campos customizados no sistema da Colabbe
ID da entidade Nome da entidade Tela onde aparecem os campos criados nesta entidade bankAccount
Dados bancários
Pré-admissões > Detalhes da pré-admissão > guia Documentos > Dados bancários
civilCertificate
Certidão civil
Pré-admissões > Detalhes da pré-admissão > guia Documentos > Certidão civil
cnh
Carteira Nacional de Habilitação (CNH)
Pré-admissões > Detalhes da pré-admissão > guia Documentos > Carteira Nacional de Habilitação (CNH)
cns
Cartão Nacional de Saúde (CNS)
Pré-admissões > Detalhes da pré-admissão > guia Documentos > Cartão Nacional de Saúde (CNS)
cpf
Cadastro de Pessoa Física (CPF)
Pré-admissões > Detalhes da pré-admissão > guia Documentos > Cadastro de Pessoa Física (CPF)
ctps
Carteira de Trabalho e Previdência Social (CTPS)
Pré-admissões > Detalhes da pré-admissão > guia Documentos > Carteira de Trabalho e Previdência Social (CTPS)
dependentBasic
Dados básicos do dependente
Pré-admissões > Detalhes da pré-admissão > guia Ficha Familiar > Básicos
dnv
Declaração de Nascido Vivo (DNV)
Pré-admissões > Detalhes da pré-admissão > guia Documentos > Declaração de Nascido Vivo (DNV)
hiringMedicalExam
Exame admissional
Pré-admissões > Detalhes da pré-admissão > guia Documentos > Exame admissional
inviteModelContract
Contrato de trabalho
Pré-admissões > Detalhes da pré-admissão > guia Contrato > Geral
passport
Passaporte
Pré-admissões > Detalhes da pré-admissão > guia Documentos > Passaporte
personalAddressBRA
Endereço
Pré-admissões > Detalhes da pré-admissão > guia Dados pessoais > Endereço
personalBasic
Dados básicos
Pré-admissões > Detalhes da pré-admissão > guia Dados pessoais > Básicos
personalBirthPlace
Local de nascimento
Pré-admissões > Detalhes da pré-admissão > guia Dados pessoais > Local de nascimento
personalComplementary
Dados complementares
Pré-admissões > Detalhes da pré-admissão > guia Dados pessoais > Complementares
personalEmail
Endereços de e-mail
Pré-admissões > Detalhes da pré-admissão > guia Dados pessoais > E-mails
personalTelephone
Telefones de contato
Pré-admissões > Detalhes da pré-admissão > guia Dados pessoais > Telefones
pis
Número de Identificação do Segurado (NIS)
Pré-admissões > Detalhes da pré-admissão > guia Documentos > Número de Identificação do Segurado (NIS: PIS, PASEP, NIT)
professionalRecord
Registro profissional
Pré-admissões > Detalhes da pré-admissão > guia Documentos > Registro profissional
proofOfEnrollment
Comprovante de matrícula
Pré-admissões > Detalhes da pré-admissão > guia Ficha Familiar > Comprovante de matrícula
reservist
Certificado de reservista
Pré-admissões > Detalhes da pré-admissão > guia Documentos > Certificado de reservista
rg
Carteira de identidade (RG)
Pré-admissões > Detalhes da pré-admissão > guia Documentos > Carteira de identidade
ric
Registro de Identidade Civil (RIC)
Pré-admissões > Detalhes da pré-admissão > guia Documentos > Registro de identidade civil (RIC)
sus
Cartão SUS
Pré-admissões > Detalhes da pré-admissão > guia Ficha Familiar > Cartão do SUS
vaccinationBooklet
Tela da caderneta de vacinação
Pré-admissões > Detalhes da pré-admissão > guia Ficha Familiar > Caderneta de vacinação
voter
Título de eleitor
Pré-admissões > Detalhes da pré-admissão > guia Documentos > Título de eleitor
Observation
- On the invitation template registration screen, HR can configure which custom fields will be visible and which must be filled in.
- The custom fields in the invitation templates are active for all companies and branches, with no possibility of distinction or scope.
- The structure of the following document tables is shared between dependents and employees: CPF, RG, RIC, proofOfEnrollment and civilCertificate. This means that when you create a custom field in the CPF table, for example, this field will appear for both the dependent and the employee.
- Before creating a custom field, make sure that the default invitation screen doesn't have a field asking for the same information. In this case, you can use the system's default field instead of the custom field.
- If a custom field is created with the same ID for Personnel Department Management and for Colabbe's system - Digital hiring, the information will be replicated for both modules. In other words, when you fill in the field in Colabbe's system, the information will be replicated for the same field in GDP, and vice versa.
How to create custom entities to group custom fields
- Log in to the senior X Platform using an account that has administrator permissions.
- Go to the menu: Technology > Customization > Fields.
- Look for the hcm domain in the list or use the search field to find it.
- In the hcm domain, look for the onboarding service. With this service you can manage the Colabbe system's customized fields, grouped by entity.
- Look for the three special entities customEntityOne, customEntityTwo and customEntityThree:

These three entities represent groupers, which will appear in the settings of the invitation template, on the Other tab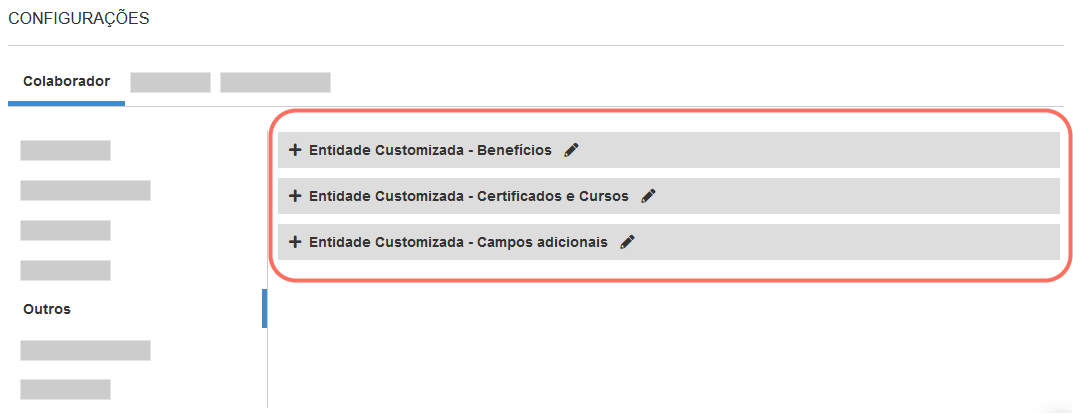
- For each special entity — customEntityOne, customEntityTwo e customEntityThree — click on the Entitybutton. The screen for adding new fields to the selected entity will appear, just click on New and add the fields you want:
Thus, the fields added to the entity will be displayed in the corresponding grouper on the Other tab in the invitation template.
Example - step by step
In this tutorial, we'll explain how to create custom fields to allow employees to enter additional courses they've completed and attach the certificate for those courses.
1. Access the onboarding service on the custom fields screen
On the senior X platform, go to the menu: Technology > Customization > Fields. Remember that this menu is only available to the system administrator or someone with equivalent permissions.
On the field customization screen, search for the hcm domain and expand the onboarding service grouper:
2. Choose the entity where you want to add the fields
Each entity represents a group of information from the pre-hiring screen.
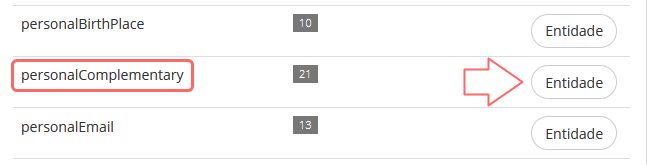
In this tutorial, we're going to add the fields to the employee's supplementary information group.
This group is represented by the personalComplementary entity. Then look for it in the list and click on Entity:
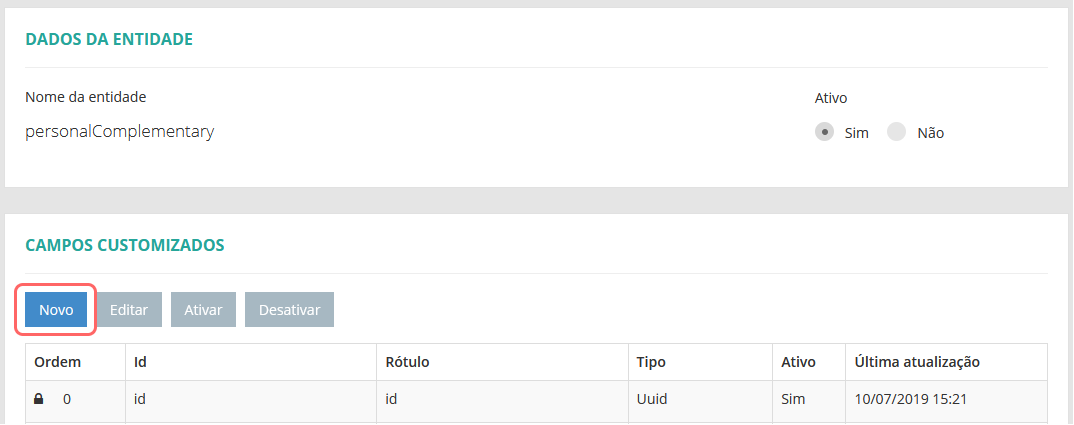
3. Add the new fields to the entity
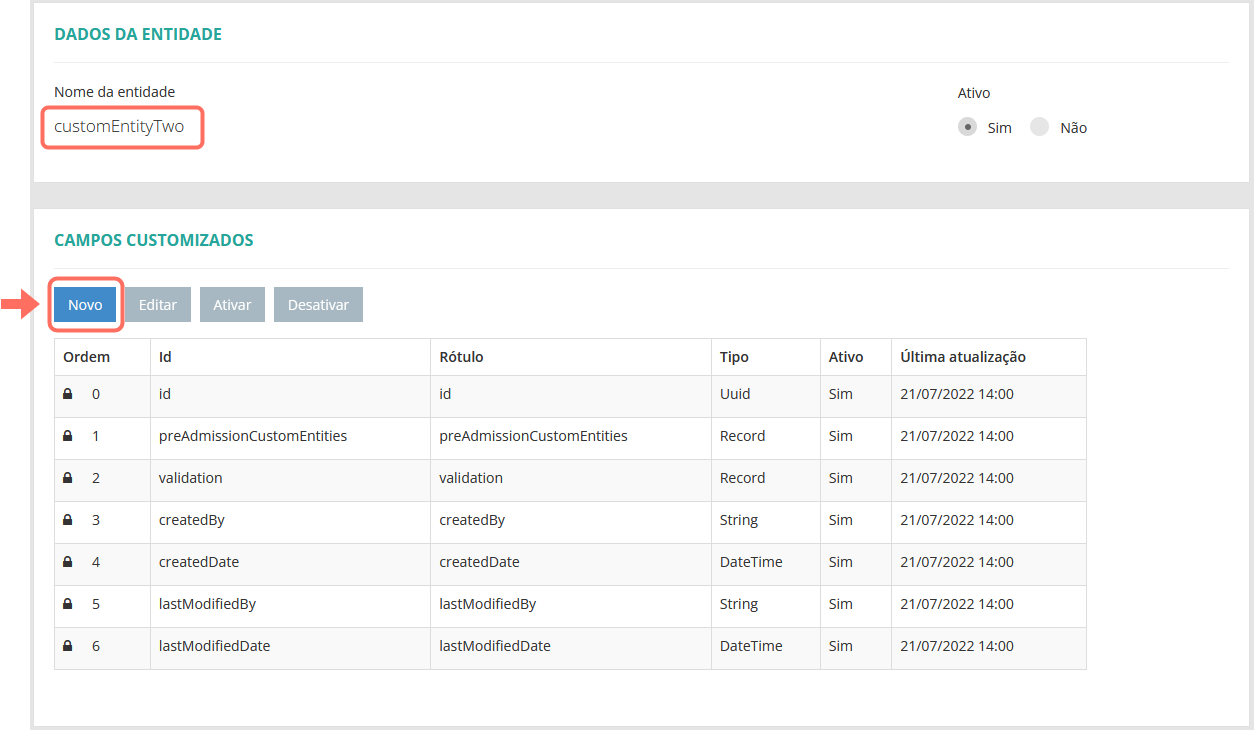
When you access an entity's screen, you may notice that it already has some fields. These are standard system fields, which are protected from any kind of editing and are identified by a padlock
To create the first custom field, click on New:
You will be shown the screen where you can make all the settings for the field.
We are only going to configure the following data, which is essential for this tutorial:
- Field ID - identifier used internally by the system. It must be a unique identifier and only letters and numbers are allowed. In other words: it cannot be the same as the identifier of another field and special characters, accents or spaces are not allowed.
- If you are setting up custom fields to integrate with Personnel Administration, the field ID needs to be the same as the name that was created in that system. To find out more, see the Personnel Administration custom field integration documentation.
- Field label - the name of the field that will be displayed on the screen for the employee to fill in.
- Field type - defines what type of information the field expects (free text, date, time, etc.)Most commonly used field types
- String - field for free text (alphanumeric characters).
- Boolean — field for selecting between Yes and No.
- Integer — field for numeric values (whole)
- Double — field for numeric values (decimals).
- Date — field for entering a date.
- DateTime — field to enter a date accompanied by a time.
- Time — field to enter a time.
- Money — field for entering a monetary value in reais (Brazilian currency).
- Blob — field to attach files, such as a PDF document or images, for example.
- Enumeration — field to display a list of options to be selected.
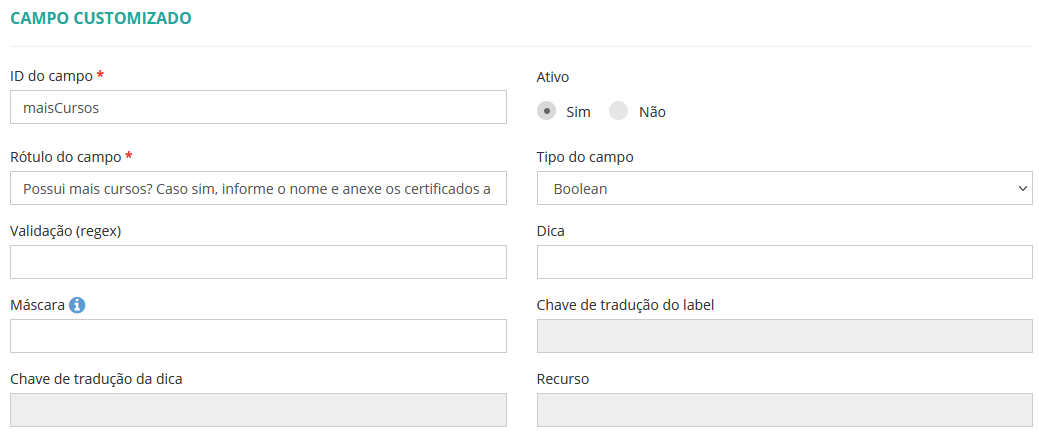
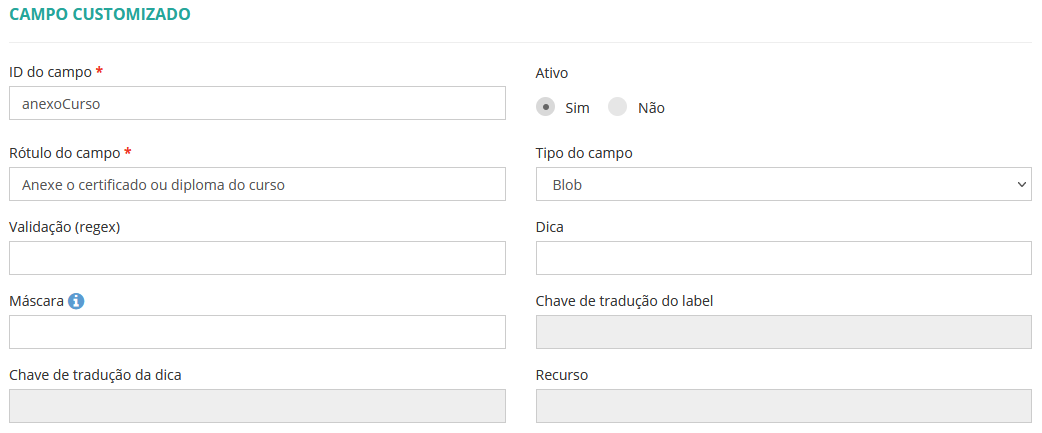
Create three fields, as shown in the following examples:
Field 1 - Field for the employee to say if they have any additional courses
Field 2 - Field for the employee to enter the name of the course

Field 3 - Field for the employee to attach the course certificate or diploma
Note
After creating the fields, remember to click Save on the entity screen to save the information. If you create the fields and close the screen without saving, your changes will be lost.
4. All set! Check the fields you have created
If you have followed the steps correctly up to this point, you will already be able to see the three fields that have been created.
To do this, go to the details of any pre-hire. Under Personal data, expand the Additional grouping:
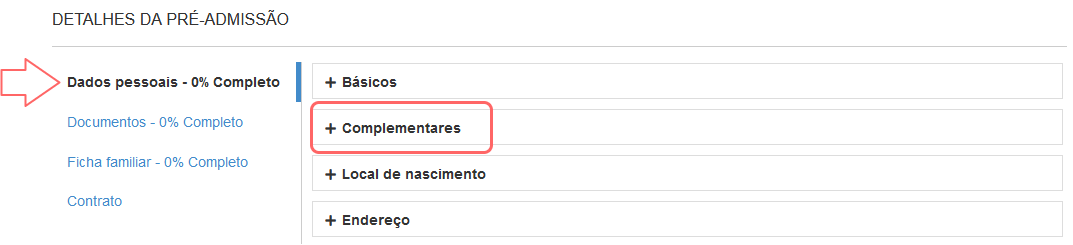
Within the grouping, the new fields will be identified as custom fields:
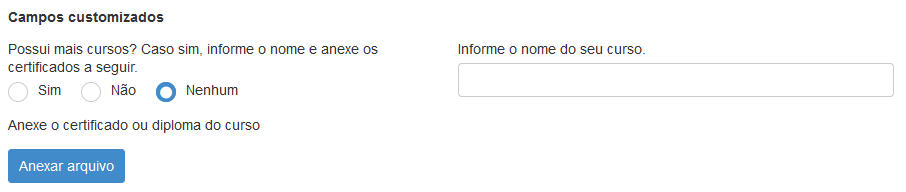
This way, whenever you send out a pre-hiring invitation, the new employee will have the option of informing you of a complementary course and attaching the certificate of completion.
Integrate Colabbe custom fields with Personnel Department Management
To integrate custom fields between the two systems, they must be created with the same ID (identifier), within the entities that are equivalent between them.
Here are the steps:
- Log in to the senior X Platform using an account that has administrator permissions.
- Go to the menu: Technology > Customization > Fields.
- Look for the hcm domain in the list or use the search field to find it.
- In the hcm domain, look for the onboarding service (which is from Colabbe) and the payroll service (from Personnel Department Management).
With these services you can manage the customized fields of the two systems, grouped by entities. - Para que o campo seja integrado entre os dois sistemas, faça o seguinte:
- Crie o campo nos dois serviços, usando a entidades que são equivalentes entre eles
- Preencha o mesmo ID do campo em ambas as entidades.Tabela de entidades equivalentes entre a Colabbe e o GDP
Entidades na Colabbe (onboarding) Entidades equivalentes no GDP (payroll) personalBasic
personalComplementary
personalBirthPlace
personalAddressBra
personalTelephone
personalEmail
person
cpf
pis
ctps
rg
voter
cnh
passport
reservist
civilCertificate
ric
cns
dnv
rg
bankAccount
financeInformation
- Crie o campo nos dois serviços, usando a entidades que são equivalentes entre eles
 English
 Español