Self-service kiosk properties
Register the properties that will be associated with a self-service kiosk and determine its functions. With this registration, you can indicate whether the kiosk will use temporary credential withdrawals, schedulings, facial recognition to find scheduled visits, among other characteristics.
What you can do:
- On senior X Platform, go to Access Control and Security Management > Lobby Management > Self-service kiosks > Self-service kiosk properties and click on Add;
- In General data, add a Description for this property set;
- Click on the Color field and select a color in the palette that will be displayed. This configuration refers to the color that some of the kiosk interface details will have, such as the buttons, for example;
- This, check the properties that will be a part of this set:
- Use scheduling: property that allows the visitor's entry through a previous scheduling on the system;
- Use temporary credential withdrawal: when checked, this property allows the worker to take a temporary credential;
- Use facial recognition to find scheduled visit: this property is also intended for visitors. Through facial recognition, the kiosk finds the visit scheduling that was registered on the system. The facial recognition functionality must be contracted to become available. Check more details atspecific documentation ;
- U s
- es facial recognition to locate provisional credentials: searches the employee’s registration using facial recognition;Uses facial recognition to validate a person’s identity : This property also serves the employee and allows them to validate their identity when logging in. The self-service kiosk checks whether the present person who is taking the credential has the same photo as the one registered;
- Facial recognition reliability percentage: if any property that uses facial recognition is checked, this field must be filled in. This percentage refers to the likeness that the photo taken on the self-service kiosk must have when compared with the photo stored on the system, and it is valid for all facial recognition properties. The minimum percentage is 75%;
- Allow entry by locator code, Allow entry by QR Code and Allow entry by document: these are the options through which the visitor may access a location. Therefore, it is necessary to indicate at least one type of entry permission so that the property registration can be completed;
- Allows you to change the person's photo during the scheduled visit/ Allows you to change the person's photo when handing over the provisional credential: These properties are for the visitor and collaborator, respectively. They allow the visitor and/or worker to change the registration photo;
- Uses provisional credential reason
- : when this property is selected, the self-service terminal will ask the employee to choose one of the reasons for requesting a provisional credential,previously registered, to justify the issuance;Automatic photo capture : This property is intended for visitors and employees and enables automatic photo capture at the self-service terminal. Thus, after the face identification, the kiosk captures the photo in three seconds, with no need for the user to click on the Take photo button. In other words, if this option is disabled, after the face identification, the user will have to click on the mentioned button and wait three seconds in the position. AAutomatic photo capture will only be available if the propertyAllows you to change the person's photo on the scheduled visit or Allows you to change the person's photo when handing over the credential is marked;
- Allows entry with username and password: by checking this property, it will be possible to search for the employee using their login and password. During the access, the user simply has to click on the Sign in with username and password option and fill in the Username and Password fields with the senior X Platform data. If the Maximum number of sign-in tries field is defined in the properties, the worker will have a limit of tries when searching for his/her data on the kiosk. If the number defined in this field is reached, the kiosk returns to the initial screen, and the worker has the option to carry out the operation manually at the reception desk.
- Terms of Acceptance: if the kiosk uses terms of acceptance in its sequence, select one of the term options by clicking on the search icon or entering your name in the text box. The system offers the Terms of Acceptance - Scheduled Credentials and the Terms of Acceptance - Temporary Credentials as default texts, each one with responsibility confirmation messages related to the ID card receipt, in the 3 languages of the kiosk.
- Satisfaction survey: if you want the terminal to present a user satisfaction survey, click on the survey icon in this field and select the desired question. The survey must be previously registered in the Satisfaction survey screen. If you select a survey, fill in the Satisfaction survey validity (in days) to determine the periodicity for the survey to be displayed.
Note
If, during the Lobby registration, the Photo validity for visitors (in days) and Photo validity for workers (in days) fields are filled in, and the validity date of the worker's/visitor's photo is expired, the kiosk will request an image change via the "To finish your registration, we need a new photo" message. In this case, click on Take photo to take the picture.
If the Allow changing the person's photo in the scheduled visit or Allow changing the person's photo in the temporary credential issuance properties are checked, the visitor/worker may change his/her photo when desired on the terminal.
Note
You can use the default terms suggested by the system or register new ones, according to the necessity.
To register, access senior X Platform > Access and Security Management > Entrance Management > Self-Service > Terms of Acceptance. After filling in the Name and Visit type fields, write the messages in the kiosk languages and click on Save.
- Click on Save.
To edit a property set, find it by using the filter or in the list of registered properties, click on it and then on Edit. If you wish to delete a property set, do that same and click on Delete.
To register your company's logo on the self-service kiosk, when registering or editing the properties, in the Property Details section, at the Logo tab, click on Add, select an image and click on Open.
To change the image, click on Change, select a new file and click on Open. If you wish to verify how it will be displayed on the kiosk screen, click on View.
Customize the texts that will be displayed on the self-service kiosk in Portuguese, English or Spanish.
The make the desired changes, use the default translation files (found at the root directory of the self-service kiosk application) as the basis:
- pt-br.json for Portuguese;
- en.json for English;
- es.json for Spanish.
Note
The files are composed by a key and its translation. The user must only change the translation, and not the key, keeping the listed structure and the punctuation.
The modification must only occur in the highlighted text:
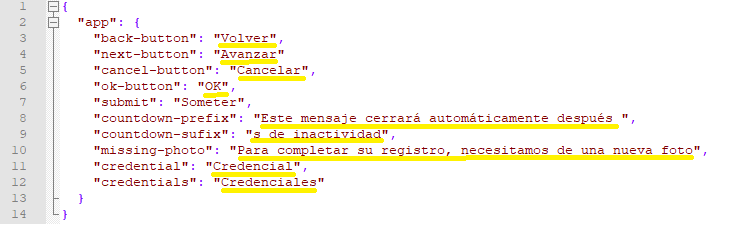
After saving the changes in these files, they must be imported:
- When registering terminal properties in the Ronda Senior system or editing it, in the Property Details section, access the Translations tab and clickTo add;
- Select the Customized language, that is, the language of the customized file that will be imported;
- Click on Select the file and choose the edited file;
- Click to Open and then on Save.
If there are not customized files, the system will use the default translations.
Important
The display of options for some fields is restricted to what was configured in thescope registered in senior X Platform roles.