Third Party Management - Processesgeneral
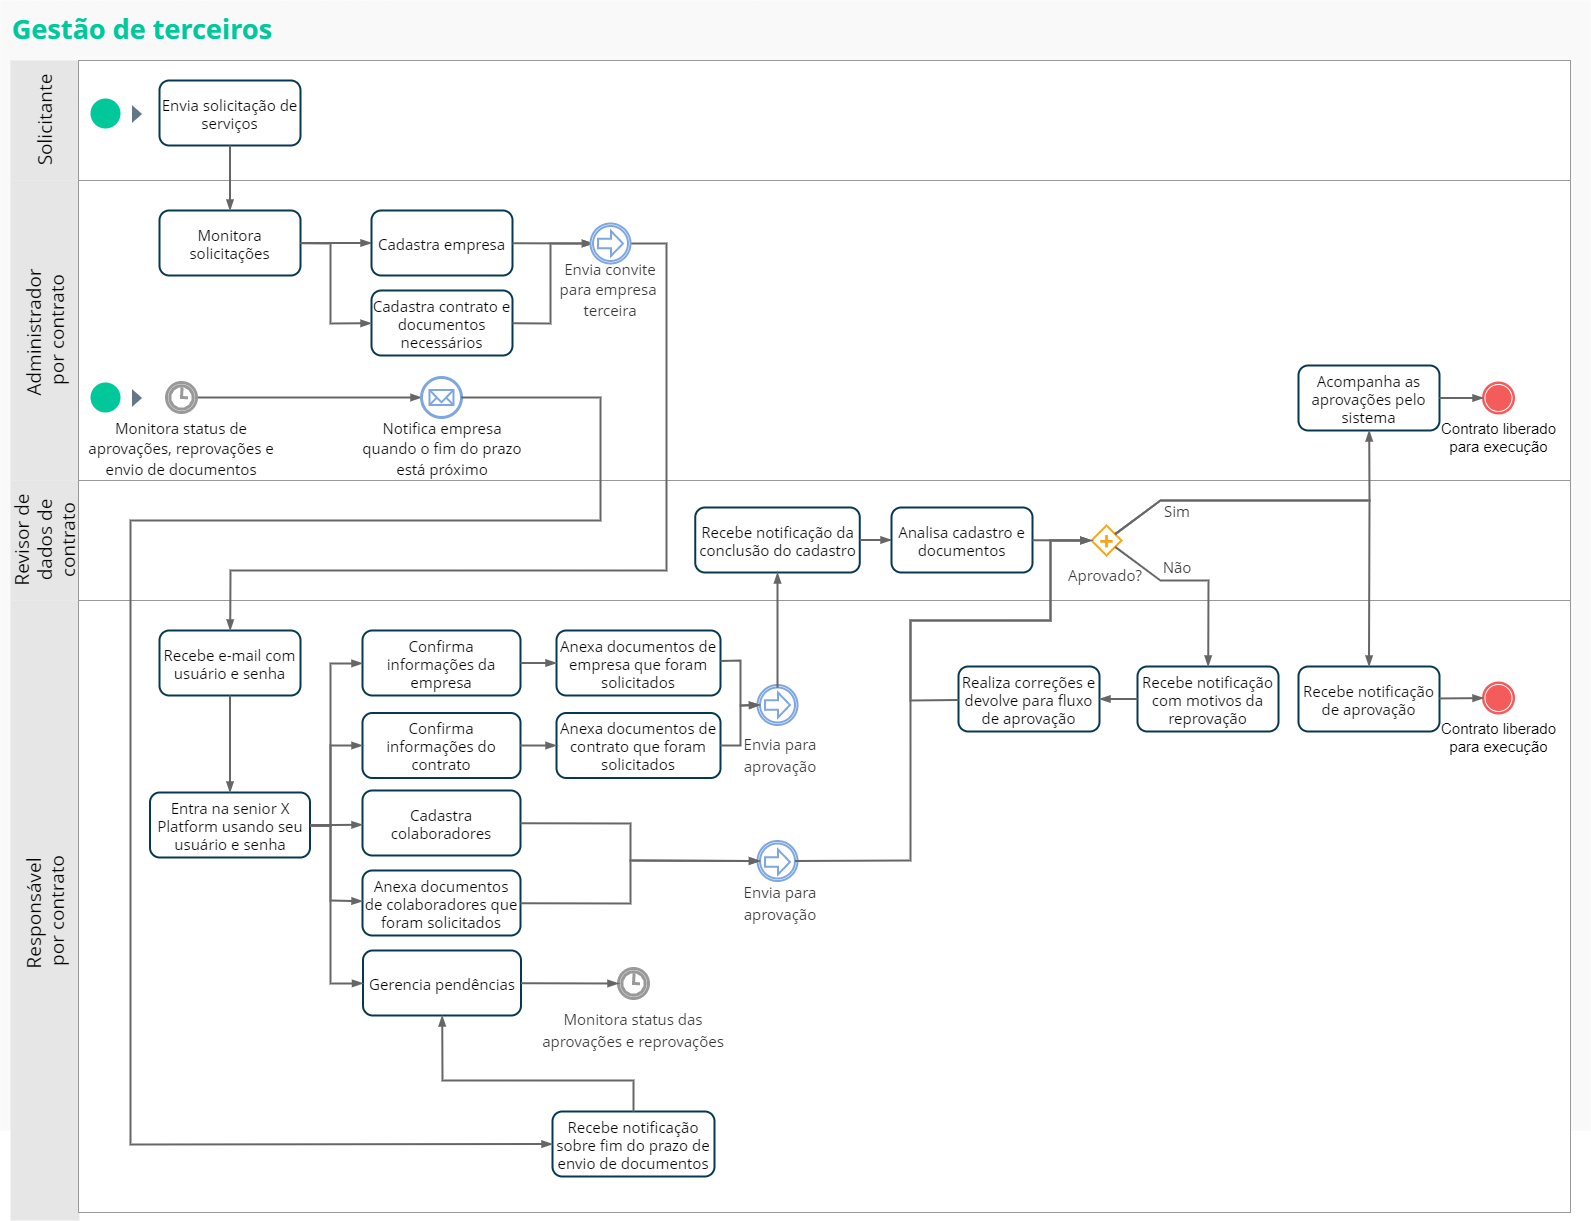
The Third Party Management module focuses on three distinct types of users, each with their respective responsibilities:
- Contract administrator: person from the contracting company responsible for making clear all the requirements for the execution of the contract. She requests, receives and organizes all documents sent by contracted companies, and is generally the contact person for this company for procedural issues;
- Responsible for contract: person from the contracted company responsible for sending all required documents. It is this person who is contacted if any of these documents expire during the execution of the contract;
- Contract data reviewer: person responsible for validating the registered data and documents sent by the third-party company and carrying out approval. Often this person is from a technical area, responsible for some specific documents, such as occupational safety, legal, etc.
These responsibilities are met by different features of the module.
Process Flow
What you can do:
Important
If there is integration with the Senior Ronda and People Management | HCM, in Third-Party Company and Contract registrations integrated with this system, is only allowed to edit information that belongs only to Third-Party Management, that is, that does not exist in Ronda Senior.
In the Third Party Company, it is only allowed to change the process ofApproval flow, register and attach the documents.
Companies without identification documents will not be integrated into Third Party Management. The CNPJ, CEI or CPF must be included in the third-party company's registration for it to be integrated. This is done in the Ronda Senior system, in the Other Companies register, by filling in the fieldsRegistration Type It isRegistration Number.
In the Contract, it is permitted to change the process ofApproval flow, the data of the person responsible for the contract (Email,Responsible Login It isTelephone), The Branch of the Contracting Company, O Default Location and theStandard Scale , in addition to registering and attaching documents.
Create custom fields
To include a field on the Third Party Management > Registrations > Collaborators screen:
- Access the Technology Customization > Fields menu;
- Locate the servicesam/application;
- Access entity fieldsperson;
- Create custom fields;
- Check whether the customized fields are available on the employee registration screen, in Third Party Management.
Important
The custom fields for this entity are sent to the BPM flow. Therefore, it must be the same name as the field in the BPM form and in the entity. In both cases, the field name must be created using lowercase characters.
To include a field on the Third Party Management > Registrations > Collaborators > Linked Contracts screen:
- Access the Technology Customization > Fields menu;
- Locate the servicesam/third;
- Access entity fieldscontractPerson;
- Create custom fields;
- In Third Party Management, access the registration screen;
- Make sure custom fields are available on the link edit screen.
Important
The custom fields for this entity are sent to the BPM flow. Therefore, it must be the same name as the field in the BPM form and in the entity. In both cases, the field name must be created using lowercase characters.
Administrator processes by contract
The contract administrator is the member of the area responsible for the company's contracts and will make the initial registrations in the system. These will define the organization of contracts, documents and related requirements, and will continue the process when they are sent to the person responsible for the contract at the third party company.
Add the documents to be managed by the system. It is recommended to first register the documents themselves, and then register companies, contracts or collaborators that will be related to the documents.
The documents are associated with a third party - they must be registered for each third-party company with which the employee has a relationship. This means it is possible to associate the same third party with different companies, which allows dates to overlap between links.
The contract administrator views all documents associated with the links that appear to his user.
- On the senior X Platform, access the Access and Security Management > Third-party management > Documents menu;
- Click on the buttonTo add;
- In the fieldDocument name, enter the name that will be used to represent this document;
- Click on the buttonTo save. The new registration will be shown in the list of documents;
- To edit or delete one of the registered items, simply select it and click on the button corresponding to the desired action.
Considering that the documents managed by this solution may be related to third-party companies, it is necessary to register them so that this association can be made in the system. The company registered here will initially be used by the contract administrator during the definition of contracts and their requirements, carried out later. This information will also be accessed and confirmed in future procedures, carried out by the person responsible for the contract at the third party company, as seen in the process "Verify company information and attach your documents".
- On the senior X Platform, access the Access and Security Management > Third-party management > Registrations menu;
- In the tabCompanies, Click on the buttonTo add;
- Fill in the informationTrade Name, Company Name, CPF/CNPJ/CEI, State Registration, address ofEmail and number ofTelephone in the General Data section;
Important
In the fieldCPF/CNPJ/CEI, it is possible to enter up to seven digits without considering any format or mask, which allows you to register codes for foreign companies or those that do not follow the standard format for these records. From the eighth digit onwards, the field will validate whether the information value is in the CPF, CNPJ and CEI format.
- Select the desired workflow in the fieldApproval flow. The options in this field are listed according to the processes registered in BPM for use with Third Party Management. For more information, see theBPM documentation;
- Optionally, fill in the information regarding the company's address in the Address section;
- Click on the buttonTo save to register the company. This displays the Company Documents section.
Now that the company is registered, the next step is to define its documents. To do this, you must first define the requirements in the Contracts tab, as shown in the following process.
Important
When registering the first company in the system, the appointments listed below (normally registered in Senior X > Technology > Customization > Appointments) are automatically inserted into the platform, in the domainsam and servicethird, and configured to run daily:
- Block third party (blockThird);
- Check expiring documents (sendDocumentsToExpireEmail);
- Check expired documents (sendExpiredDocumentsEmail).
They are important for the routines to function, and this way the user does not need to register manually.
One of the contract administrator's responsibilities is to define the information on the contracts that will be managed by the system, as well as the documents required by them. After registering company(ies) and document(s) in the previous processes, this information can be defined.
Note
A contract cannot be used simultaneously by more than one of these registries, so consider adding specific contracts for each situation.
- On the senior X Platform, access the Access and Security Management > Third-party management > Registrations menu;
- On the Contracts tab, click the buttonTo add;
- In the General Data section, enter the name of the company previously registered in the fieldCompany to select it;
- Fill in other general data relating to the contract, such as yourNumber It isDescription. For detailed information about certain fields, seethe contract screen documentation;
- The fieldApproval stage is automatically populated according to the current status of the request. For more information, see thedocumentation of this field;
- If you areintegrated with Ronda Senior and People Management | HCM, fill in the necessary fields to register the employee in these systems:Branch of the Contracting Company (select an Organizational Structure of the Branch type),Default Location (select an Organizational Structure of type Location) andStandard Scale (here you must define the same code as a scale in the Ronda Senior and People Management | HCM system). If there is no integration with the systems, these fields are optional;
Important
After the contract is sent from Ronda Senior and People Management | HCM for Senior Round X by the Integrator, the contract administrator will have to inform these fields in the contract, in addition to defining the process used in the Approval Flow.
The integration variables that can be used in the Approval Flow can be consulted on the Process Variables screen, accessible in the panel to the left of the BPM flow screen. You can also consult them atintegration variables page of this manual.
- For now, leave the fieldStatus set to active. If this registration has to stop being used at some point, it cannot be deleted. However, through this field, it can be deactivated;
- Click on the buttonTo save to register the company. With this, the Required Documents section is shown;
- To grant access to the system to the person responsible for the contract, fill in theName It isSurname of the person responsible, yourEmail and define aLogin. The value filled in this last field will be used as the username for the person to access the system. The password will be defined by the person at this time;
- If the fields above have been filled in, the buttonSend access to Senior will be shown. Click on it tosend an email to the person responsible for the contract at the third-party company, so that he or she can access the platform and carry out its procedures (which can be seen in the "Verify company information and attach your documents" process below);
- To register the contract requirements, in the Required Documents section, click on the buttonTo add. A new screen will open;
- On the Required Document tab of this new screen, in the fieldDocument, select the document previously registered in the "Register documents to be managed" process;
- In the fieldRequirement Holder, indicate whether in this contract the document in question will be associated with a third-party collaborator, contract or third-party company. This will define in which of these registration types the document will be shown. For example: defining that the document holder is a third-party company will show it in the list of documents required by third-party companies, if this contract is associated with one;
- If it is necessary to register a document of this type for the contract, select the fieldMandatory Document. Otherwise, the document will be optional in the contract;
- Indicate in the fieldValidity Type, whether the validity of the document will be for a period (number of days, months or years), defined in the document itself or if there is no validity period. If the "Period" option is selected, new fields will be shown so that the duration of this period can be defined;
- Click on the buttonTo save. You will be returned to the previous screen and the registered requirement will be listed in the Required Documents section;
- To edit or delete one of the registered items, simply click the buttonActions and then on the desired action.
These contracts can be used in employee records, both by the contract administrator himself and also by the people responsible for the contract, whose processes will be seen later.
The email sent to the person responsible for the third-party company can be personalized in advance. For that:
- On the senior X Platform, access the Technology > Administration > menuInternationalization;
- Locate the platform/external users service;
- Export the file (by clickingExport
- ),
- open it and edit the following keys:
- Once edited, import the file again.
If the email is not customized, it will be sent with the system's default layout.
The Collaborators tab allows collaborators to be added to the system and also associated with contracts registered in the "Register contracts and their requirements" process, complementing the other registrations made.
- After accessing the senior X Platform, open the Access and Security Management > Third-party management > Registrations menu;
- On the Collaborators tab, click the buttonTo add from the Active Collaborators list;
- Select theDocument Type which will be used to identify the person. The options in this list are registered on theTypes of Documents;
- Fill in the general registration data and also, optionally, the employee's address;
- Click on the buttonTo save to record this data. When you do this, the Linked Contracts section is shown;
note:
The Linked Contracts screen only displays links that are currently in effect. Future links are not shown.
- If there are already registered contracts and you want to add one or more of them to the collaborator, clickNew Bond. A new panel will be shown on the right of the screen;
- Locate the registration of the contract in question using the fieldContract and fill in the other details. Then clickTo save;
- Check the required documents in the Employee Documents list, which are based on the contract selected in the previous step. Various information about these documents can also be checked, for example: whether they are mandatory and the format of their validity;
- To add a document, click the buttonActions to the right of one of the list items, and thenInclude. A new panel will be shown on the right of the screen;
- Enter the necessary data in the fields on this panel. IfValidity Type is "Defined in the document", also inform theExpiration date according to the expiration date of the document;
- Click on the buttonTo save. The options to delete the record and attach files to the document will become available;
- To add documents to the registry, clickAttach Files and select the desired file;
- click inTo close to finalize the registration of the document;
- To notify the contract data reviewer that this registration has been carried out and request verification, click the buttonSubmit for Approval.
Another procedure that the Administrator, by contract, can carry out is the registration of which activities will be carried out by third parties. For more information, see thedocumentation of this feature.
Processes of the person responsible for the contract
The procedures of the person responsible for the contract in the third-party company begin when theyreceive the email with the data for accessing the system (sent by the administrator by contract, at the contracting company). When opening the platform access link in the email received, this person must use the login and password sent to access the system. A new personal password can then be registered.
When this email is sent, the contract responsible role is automatically created for this user to access the system.
With this, the person responsible will be able to carry out their part of the registrations, send documents for approval to other people who are part of the process, make adjustments where necessary and receive notifications about pending issues and documents about to expire.
Comments
Only active contracts are shown for users with this role (responsible for contract) in the system.
The contract officer sees all documents associated with companies with linked contracts under his responsibility. Consequently, he does not view documents registered for third-party companies that are not his responsibility.
Initially, you must validate the company's data, which were registered by the administrator by contract, and make any necessary changes. After this and attaching the company documents, this information must be sent for validation by the contract data reviewer (as seen in the "Receive and evaluate registrations" process).
- After accessing the senior X Platform, open the Access and Security Management > Third-party management > Registrations menu;
- On the Company tab, locate the company registration in the list;
- Click on the buttonActions right and thenTo edit;
- Check that the information provided in the registration is correct. If they are not, contact the contract administrator who filled in this data so that they can be adjusted;
- Check the required documents in the Company Documents list. Various information about these documents can also be checked, for example: whether they are mandatory and the format of their validity;
- To add a document, click the buttonActions to the right of one of the list items, and thenInclude. A new panel will be shown on the right of the screen;
- Enter the necessary data in the fields on this panel. IfValidity Type is "Defined in the document", also inform theExpiration date according to the expiration date of the document;
- Click on the buttonTo save. The options to delete the record and attach files to the document will become available;
- To add documents to the registry, clickAttach Files and select the desired file;
- click inTo close to finalize the registration of the document;
- To notify the contract data reviewer that this registration has been carried out and request verification, click the buttonSubmit for Approval.
Another procedure that must be done is to validate the contract data that has arrived, adjust whatever is necessary and attach the documents related to contracts. This information must then be sent to the contract data reviewer to validate (as shown in the "Receive and evaluate registrations" process).
- After accessing the senior X Platform, open the Access and Security Management > Third-party management > Registrations menu;
- On the Contracts tab, locate the contract record in the list;
- Click on the buttonActions right and thenTo edit;
- Check that the information provided in the registration is correct. If they are not, contact the contract administrator who filled in this data so that they can be adjusted;
- Check the required documents in the Contract Documents list. Various information about these documents can also be checked, for example: whether they are mandatory and the format of their validity;
- To add a document, click the buttonActions to the right of one of the list items, and thenInclude. A new panel will be shown on the right of the screen;
- Enter the necessary data in the fields on this panel. IfValidity Type is "Defined in the document", also inform theExpiration date according to the expiration date of the document;
- Click on the buttonTo save. The options to delete the record and attach files to the document will become available;
- To add documents to the registry, clickAttach Files and select the desired file;
- click inTo close to finalize the registration of the document;
- To notify the contract data reviewer that this registration has been carried out and request verification, click the buttonSubmit for Approval.
The Collaborators tab shows a list of active collaborators registered by the manager, associating them with a contract. The person responsible for the contract can also add employee records here.
- After accessing the senior X Platform, open the Access and Security Management > Third-party management > Registrations menu;
- On the Collaborators tab, click the buttonTo add from the Active Collaborators list;
- Select theDocument Type which will be used to identify the person. The options in this list are registered on theTypes of Documents;
- Fill in the general registration data and also, optionally, the employee's address;
- Click on the buttonTo save to record this data. When you do this, the Linked Contracts section is shown;
note:
The Linked Contracts screen only displays links that are currently in effect. Future links are not shown.
- click inNew Bond. A new panel will be shown on the right of the screen;
- Locate the registration of the contract in question using the fieldContract and fill in the other details. Then clickTo save;
- Check the required documents in the Employee Documents list, which are based on the contract selected in the previous step. Various information about these documents can also be checked, for example: whether they are mandatory and the format of their validity;
- To add a document, click the buttonActions to the right of one of the list items, and thenInclude. A new panel will be shown on the right of the screen;
- Enter the necessary data in the fields on this panel. IfValidity Type is "Defined in the document", also inform theExpiration date according to the expiration date of the document;
- Click on the buttonTo save. The options to delete the record and attach files to the document will become available;
- To add documents to the registry, clickAttach Files and select the desired file;
- click inTo close to finalize the registration of the document;
- To notify the contract data reviewer that this registration has been carried out and request verification, click the buttonSubmit for Approval.
In the Collaborators tab, it is possible to add collaborators in batches, using files with the information.
- After accessing the senior X Platform, open the Access and Security Management > Third-party management > Registrations menu;
- In the Active Collaborators list, within the Collaborators tab, click the buttonTo add and select Add in batch. The system will open the Add Collaborators screen;
- To download the file template, clickDownload the model list at the bottom of the screen;
- If you already have the file filled out with employee information, clickAttach files;
Important
The names of the column titles in the .CSV file must follow the same order established in the model list. Filling in information in some columns must follow the following rules:
- Choose one of the types of documents already registered through Menu > Access and Security Management > General Registrations > Document types. For example: register the CPF option, on the screen mentioned above, and enter this same option in the Document type column of the .CSV
- file;
- The document number may contain a mask and, if a digit is missing, a zero will be added to the left;In the Contract ID column, only numbers must be filled. The information must be obtained in the fieldContract ID, during contract registration in the Contracts tab;
- When filling in the date, you must follow the date/month/year formatting. For example: 12/12/2023;
- When filling in the Sex column, choose one of the options: Female, Male, Unknown;The values filled in the ZIP code and Telephone columns may contain a mask. For example: (99) 99999-9999 or 99999999999;
- Check the imported information, ensuring that the values in each field are filled in correctly;
- After checking that it is correct, click the buttonTo save.
In the Collaborators tab, the person responsible for the contract can view the registered collaborators and must then add the documents that were requested in these records.
- After accessing the senior X Platform, open the Access and Security Management > Third-party management > Registrations menu;
- On the Collaborators tab, locate the employee's record in the list;
- Click on the buttonActions right and thenTo edit;
- Check that the information filled in when registering is correct. If not, make the necessary changes and then click the buttonTo save;
- Check the contract information in the Linked Contracts list;
- If changes are necessary, click the buttonActions right and thenTo edit. Fill in the information and clickTo save
- ;If this contract has been linked by mistake or should not be linked for some other reason, click the buttonActions right and thenDisassociate.
- If you need to add a new contract, clickNew Bond. A new panel will be shown on the right of the screen. Locate the registration of the contract in question using the fieldContract and fill in the other details. Then clickTo save;
- Check the required documents in the Employee Documents list. Various information about these documents can also be checked, for example: whether they are mandatory and the format of their validity;
- To add a document, click the buttonActions to the right of one of the list items, and thenInclude. A new panel will be shown on the right of the screen;
- Enter the necessary data in the fields on this panel. IfValidity Type is "Defined in the document", also inform theExpiration date according to the expiration date of the document;
- Click on the buttonTo save. The options to delete the record and attach files to the document will become available;
- To add documents to the registry, clickAttach Files and select the desired file;
- click inTo close to finalize the registration of the document;
- To notify the contract data reviewer that this registration has been carried out and request verification, click the buttonSubmit for Approval.
After the contract data reviewer evaluates the registrations that were submitted for approval, the result may be an approval or disapproval (as shown in the "Receive and evaluate registrations" process). In the latter case, it is the responsibility of the person responsible for the contract to make any adjustments requested by the reviewer.
This pending issue will be notified through senior X Platform and/orby email, depending on how the approval flow selected in these records is configured in the BPM - Business Process Management system.
Furthermore, these requests can be monitored through the BPM Task Center screen. In the steps below, we will use this screen for example purposes.
- After accessing the senior X Platform, open the Senior X Platform > BPM > Task Center menu;
- Locate pending adjustments that must be addressed;
Tips:
- The pending issues are organized by process, according to what was filled in in the fieldApproval flow by the person who made the registration.
- Find the desired issues more easily using the resources on this screen. On the left side there are quick filters that allow you to show only pending or unread items, for example. And at the top of the screen, on the buttonFilter, there are search options by number and/or requester.
- If a third-party document is associated with several links of the same person, there is no need to adjust all of them. Just enter just one of the links and make the adjustment in the document, and it will be updated in all others.
- Click on the desired issue. A screen will open containing a form whose fields vary according to what was defined for this process in BPM;
- Check the received data and its details in the form fields. Pay attention to adjustment requests and observations sent by the reviewer;
- Make corrections to the corresponding records by accessing the Third Party Management screens again, according to the steps shown in the previous processes;
- When completing the modifications, check that the fieldSend to of the Task Center is set to "Continue" and the fieldResponsible has the user who reviewed this request;
- Click on the buttonTo send to send the issue back to the reviewer.
The reviewer will then receive a notification indicating that the adjustments have been completed and that this registration must be reviewed again.
Contract Data Reviewer Process
This is the person who receives the registrations sent for approval, and who evaluates them to check if they are suitable. It must also inform what corrections are necessary if the records are not adequate. Regarding the review, this role effectively establishes communication with the other two roles in the general Third Party Management process, which are notified during the reviewer's actions.
When contract managers or people responsible for contracts send documents for validation (as seen in the previous processes, whenever the user clicks the buttonSubmit for Approval), the contract data reviewer user receives a notification on the senior X Platform. This indicates that there is a pending document to be reviewed by him. Depending on how the approval flow selected in these records is configured in the BPM - Business Process Management system, the reviewer may also be notifiedvia email.
Furthermore, these requests can be monitored through the BPM Task Center screen. In the steps below, we will use this screen for example purposes.
- After accessing the senior X Platform, open the Senior X Platform > BPM > Task Center menu;
- Locate pending approval requests that must be addressed. They may require approval from a third party company (in which case the company name will be shown in the title), a contract (which will show the contract number in the title) or a collaborator (which will show the collaborator's name);
Tips:
- The pending issues are organized by process, according to what was filled in in the fieldApproval flow by the person who made the registration.
- Find the desired issues more easily using the resources on this screen. On the left side there are quick filters that allow you to show only pending or unread items, for example. And at the top of the screen, on the buttonFilter, there are search options by number and/or requester.
- If a third-party document is associated with several links of the same person, there is no need to check and approve all of them. When approving/rejecting just one of the links associated with the document, all others will be updated as well.
- Click on the desired issue. A screen will open containing the approval form, whose fields vary according to what was defined for this process in BPM;
- Check the received data and its details in the form fields. Also see files attached to the request in the Attachments tab;
- Set scan results in the fieldSend to:
- If e verything is OK, with no corrections or observations required, select "Approved";If there are changes or adjustments to be made, select "Adjustments";
- Click on the buttonTo send to finalize the review and send it back to the requester.
The requester will then receive a notification in a similar way - BPM and/or email, according to the approval flow, in addition to being located in the Task Center.
If the end result is an approval, the process is completed and the people involved are notified. If it is a rejection, the previous cycle is repeated: the requester makes the changes and submits it for approval again, until there is nothing left to be corrected. These steps can be seen in the "Make adjustments after registration is rejected" process.
Important
When approving a holder,all this holder's documents will also be approved. This happens even if one of the documents has just been updated after submission for approval, or if reviewers do not have coverage for all documents. In the latter case, it is recommended to configure the approval flow so that, at the end of the process, all documents have been reviewed by at least one reviewer.
Considering these situations, the contract data reviewer will need to validate the documents on the BPM screen to confirm whether the holder can be approved or not.
The reviewer has the option of submitting a credential during approval of a pending issue. Find out more by checking out thethird-party management information on the credentials page.
This field indicates the current status of the registered request, according to the steps that have already been carried out and those that are still pending. It serves as an indicator, cannot be changed by the user, and is automatically set to one of the following values as the process progresses:
- Draft: initial value, which goes from the moment the holder registers until the login is sent to the person responsible for the contract;
- Login sent: when the contract administrator sends the login to the contract manager, the contract and company will have the approval step updated to "Login sent";
- Registration in progress: informs that the holder's registration is being carried out. It occurs when a document is registered, when a collaborator is signed up, or when editing a registered document. This step is also used when a request is cancelled;
- Awaiting approval: after sending the holder for approval, this field will have the value "Awaiting approval" until the contract data reviewer requests any adjustment to the request or approves the holder;
- Awaiting adjustments: if the reviewer does not approve the contract, this field will be updated to "Awaiting adjustments", informing the user responsible for the contract to adjust the documents in question. This step is also presented when deleting a required mandatory document, or when the third party isblocked by the system due to an expired document;
- Approved: presented when the holder's request has been approved by the reviewer.
Sending notifications by email
In Third Party Management processes, some specific events send emails. The situations that generate certain emails are the following:
- Pending and Expired Documents Email: sent to the person responsible for a contract when this contract has required documents that are still pending or expired (whether for a contract, third party or company);
- Email of Documents About to Expire: sent to the person responsible for a contract when this contract has registered documents (whether for a contract, third party or company), if the document has an end date and it expires in 15 days or less.
In addition to being sent to the person responsible by contract, emails are also forwarded to the administrator by contract.
The email address to which these notifications are sent is registered on the contracts screen, along with the name of the person responsible for the contract. As for the administrator who will receive the email, this is the administrator user who created the contract.