English
 Español
Gamification 3.0
A Gamification 3.0 emerged to make the gamification process even more consistent and adaptable. It allows various activities performed on the platform to generate rewards for students, and the platform administrator can decide the format of these rewards, making the process even more dynamic.
To use this gamification model, it is necessary to have the Gamificationmodule, and request the support team to enable Gamification 3.0. If you already use Gamification 2.0 and want to change it, it is possible to make this modification without losing the ranking and scores.
Important!
When enabling Gamification 3.0, this action cannot be undone.
For Platform Administrators
Here you will find information about the registrations and administration of Gamification 3.0. To use it, simply access the Gamification > Manage menu.
To enable Gamification 3.0 correctly, the following platform configurations are necessary:
- Use Theme 3.0
- Use the New Home
- Have the Gamification module enabled
- Activate Gamification 3.0
- General Configurator > Gamification > Enable gamification in the system
Before starting the gamification implementation process, clear strategic planning aligned with organizational objectives is fundamental. Gamification is not just a fun way to engage employees; it should be developed to solve real problems and improve performance indicators.
Planning begins with defining clear goals: what does the company hope to achieve? Gamification should be connected to larger objectives, such as increasing course engagement, improving knowledge retention, or promoting a culture of collaboration.
Next, it’s important to think about measurable results. The success of gamification can only be evaluated if objective performance criteria are defined, such as an increase in daily logins or a reduction in training dropout rates.
Another critical point in planning is understanding the profile of the employees. Who are the people who will participate in the gamification? For game mechanics to be effective, they need to resonate with the motivations and interests of the target audience, and this can be done through the creation of personas. These personas will guide the design of challenges, rewards, and themes of the gamification, ensuring that they are connected to the needs and desires of the users.
With solid planning, gamification will have a stable base to generate continuous engagement and achieve expected results, remaining an effective tool over time.
The reward system of gamification 3.0 is quite flexible, and uses badges, points, koins, and levels to encourage student participation. Each of these resources works in a specific way, and you can combine the various types of rewards according to the expected student engagement. Badges can be considered as medals, insignias, or distinctions, that is, they are visual representations of the student’s achievements and recognitions. Points are used for ranking classification and also for obtaining experience levels. Thus, experience levels can represent milestones in student development and, upon reaching them, the student can obtain even more rewards. Koins, in turn, are a kind of exchange currency and can be used in the store to redeem prizes.
With this in mind, you should understand what the expected engagement actions are from the student and thus reflect on the best way to distribute these rewards, as they can be offered both together and separately.
Learn more about each of the resources in the reward system:
When we talk about badges, we are referring to insignias that the student can obtain and that will be presented in the student’s profile. Normally, badges are related to milestones or achievements, as if they were medals. Badges can be linked to:
- Achievement of challenges;
- Completion of Missions;
- Participation in Campaigns (achievement of individual and collective goals);
- Reaching levels.
When registering badges, you can insert custom images that serve as a visual indicator of this student’s achievement. It is recommended to follow the same visual pattern and layout for these images, as they will compose the medal board in the student’s profile. Badges also need to have a name and may contain a description. The same badge can be linked to more than one challenge/mission/campaign, meaning the student can earn the same badge more than once. In their medal board, the number of times that badge was earned will be displayed.
On the badge administration page, you can add and edit badges, view where the badge is associated, and also delete badges, as long as they are not associated with users, challenges, missions, or levels.
Upon earning badges, the student can choose, via profile editing, which badge will be displayed in their profile. They can also view their medal board through a widget.
Points and koins, despite having a similar mechanic, serve distinct functions within the platform. Points are used to classify the student within the ranking. Additionally, it is through points that the student can level up in experience. Koins, on the other hand, are a kind of exchange currency. They don’t count towards the student’s ranking or levels. However, koins are used in the store to redeem prizes.
In the points administration panel, you can manage both points and koins. There, it is possible to view the points and koins of each student, as well as credit (add) or debit (remove) points and/or koins. These changes can be made per student by clicking on the edit pencil icon next to their name, in batch by selecting more than one student and clicking on Batch Edit or even via file import, through the Points Importbutton.
When crediting or debiting points/koins individually or in batch, you can, in addition to informing the credited/debited amount, insert a description of this transaction to be displayed in the student’s statement. If there is no description, a standard message of “Administrator” will appear in the statement description. It is also possible to inform an expiration date for the credited points/koins, if necessary.
For import via spreadsheet, you need to select whether the import will be a debit or credit and then inform if the operation will be for points or koins. Just download the template that the platform offers, fill it out correctly, and save it in .csv format to proceed with the import. If you have doubts about filling out the spreadsheet, consult our import pattern example:
Example of CSV Structure
IDENTIFIER | POINTS | DESCRIPTION |
|---|---|---|
0124154210 | 150 | Adjustment |
Field Descriptions
Field | Required | Type | Description | Character limit |
|---|---|---|---|---|
User identifier | Yes | Alphanumeric | Key field that identifies the user | 255 |
Points/Koins | Yes | Numeric | Quantity of points or koins that will be debited or credited | 255 |
Description | No | Alphanumeric | Text that will be displayed to the student in the statement. If not filled, the text displayed will be “Administration” | 80 |
Still within the points administration menu, there is the Points Resetoption. When using this option, the administrator needs to define a date for the points balance of all students to be zeroed, zeroing the points balance of all students up to the day chosen by the administrator. For the reset to occur correctly, the option “Reset the BALANCE of points of ALL, of ALL students:” needs to be enabled. If a date has been defined, but this option is disabled, the reset will not occur. You can delete the points reset schedule, if it has not yet occurred, by clicking on the trash can icon next to the date.
Attention!
The action of resetting the student’s points balance is definitive and, once performed, cannot be reversed!
Experience levels often represent a milestone in student development, and serve to give a sense of progression or growth within the gamification system. The level system allows the student to advance as they earn points by completing tasks (challenges, missions, or campaigns). The level increase can also be accompanied by rewards, such as specific badges for each level, which recognize the student’s achievements and encourage their development.
The student can track the amount of experience already gained through a progress bar and can also view how many points are needed to reach the next level.
When registering a new experience level, it is necessary to give it a name. This name will be displayed to the student. It is possible to add a description and an image to the level, and indicate whether this level is active or inactive. Then, it is necessary to indicate how many points are needed for the student to reach this level. It is also possible to add a reward (badges, points and/or koins) to the student who reaches this level. In advanced settings, you can set an expiration date for the reward obtained through the level and also segment the level by target audience and/or units, in addition to adding a personalized celebration.
The level administration panel displays existing levels, the points needed to obtain the level, its reference image, if any, the date of the last update, and by expanding the level through the arrow icon, it is possible to view the rewards upon reaching it. It is also possible to edit the level or delete it.
Attention!
When deleting a level, students who belong to it lose that level and the rewards they received for it. If you want this level to no longer be available for use, without the students who have already reached it losing the rewards, it is recommended to deactivate the level, instead of deleting it.
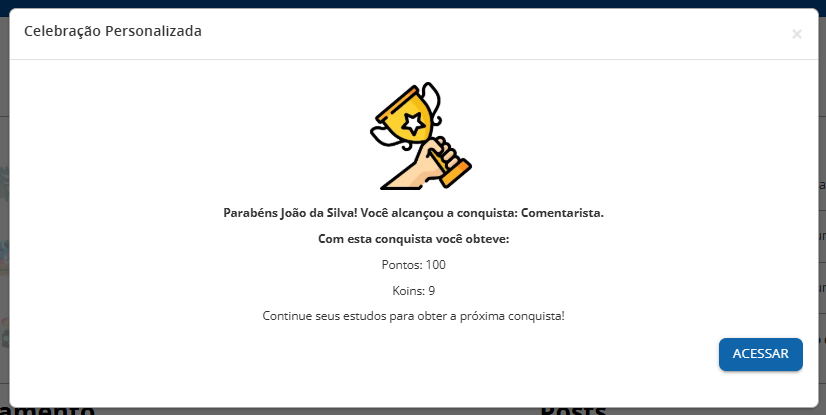
Celebrations are messages displayed to the student when they complete a mission or challenge, or when they reach a new experience level. For them to be displayed, it is necessary to enable them by accessing Gamification > Administration > Settings > General Settings. By activating the feature Enable celebrations, the student starts to view celebrations in every challenge, mission, or level they conquer. There is a pre-configured default celebration, and there is the possibility of creating custom celebrations.
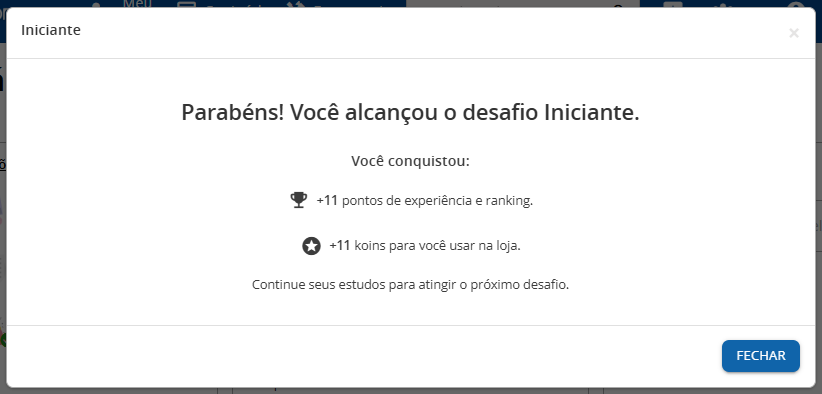
The default celebration indicates to the student which mission, challenge, or level they have reached, and informs how many points and/or koins were earned. This message is not customizable, and is displayed to the student whenever there is no custom celebration configured.
Click on the image below to expand:
Custom celebrations can be registered and linked to challenges, missions, and levels, and there is no limit to the creation of custom celebrations. The same custom celebration can be added to different achievements, but each achievement (challenge, mission, or level) can have only one celebration linked.
Registration of Custom Celebrations
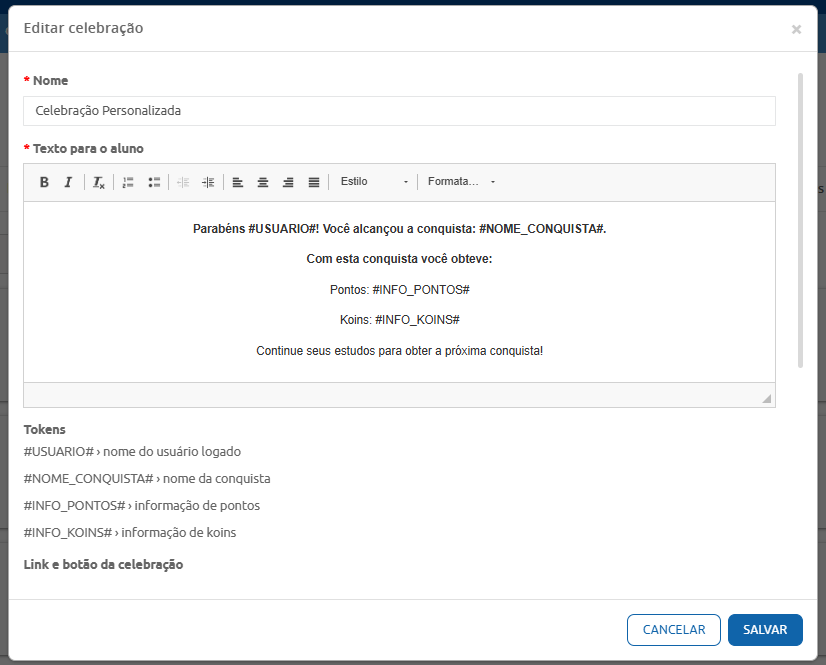
To register a custom celebration, click on Add Celebration and enter a name for the celebration. This name will be visible to the student in the celebration title. Then, you can edit the message that will be displayed. There are several text editing features available, such as bold, italic, text alignment, text style, among others. Additionally, we provide tokens for message customization. They are:
- #USUARIO# = Presents the name of the logged-in user
- #NOME_CONQUISTA# = Presents the name of the student’s achievement
- #INFO_PONTOS# = Presents the amount of points obtained by the achievement
- #INFO_KOINS# = Presents the amount of koins obtained by the achievement
To assist in creation, the text editing box already comes with an example message.
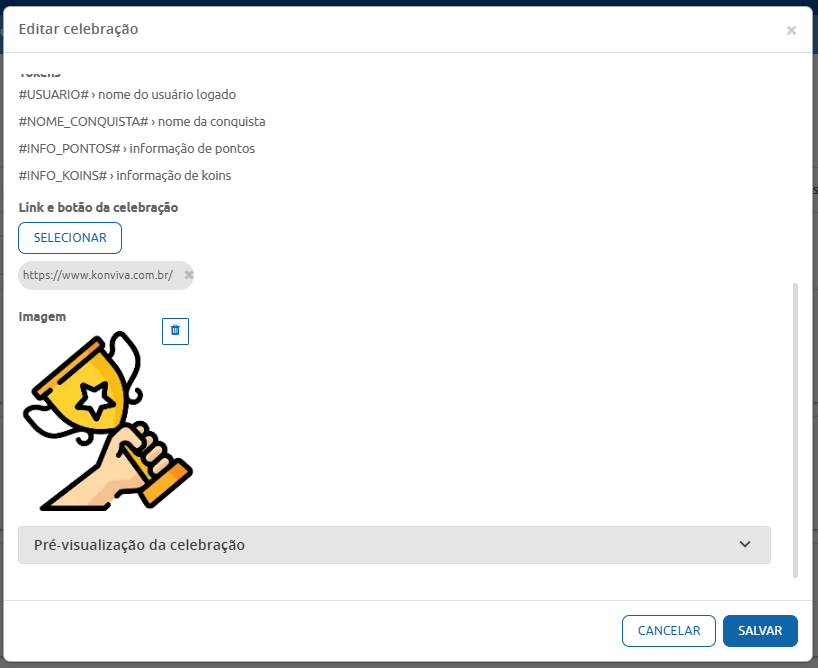
Next, it is possible to add an access button with a link. You can select the button alignment and add the desired link. Finally, there is the option to add an image, in JPG or PNG formats, ideally 200px x 200px.
Click on Celebration preview to see how it will be displayed to the student. When saving the celebration, it becomes available to be added to challenges, missions, and levels.
By clicking on the images below, you can view an example of how a custom celebration was registered, linked to a challenge, and displayed to the student.
Celebration registration:
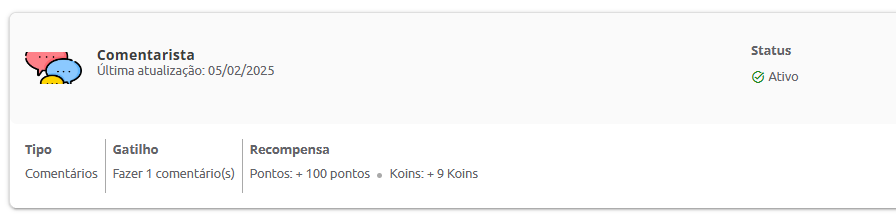
Challenge associated with the celebration:
Celebration in the student’s view:
Celebration Administration
In the celebration panel, you can view all the celebrations already created and search for them by name. It is possible to edit a celebration by clicking on the pencil icon  , or delete it by clicking on the trash can icon
  . You can view which achievements are linked to the celebration by clicking on the listing icon
  . A modal will be displayed indicating the type of achievement (challenge, mission, or level), as well as its name. The association of celebrations to achievements is done in the registration/editing of the achievement, in Advanced settings.
Challenge Registration
Challenges are activities that the student must complete to earn badges, points, and/or koins. When registering a challenge, you need to decide on a name for it, and you can add a description and image if desired. It is also mandatory to define the challenge status, that is, whether it is active or inactive. Next, it is necessary to choose the type of challenge, as well as the trigger to grant the reward. The types of challenges vary according to the resource to which the challenge will be linked. They can be linked to actions in the system, courses, library items, tracks, and the forum. To learn about the specifics of each type of challenge and its triggers, see below:
Platform accesses
Based on the number of accesses the student makes to the platform.
Triggers:
- When logging in for the 1st time;
- Log in 50 times;
- Log in 100 times;
- Log in 500 times;
- Log in 5,000 times.
Systemic learning
Based on the number of courses in which the student is approved, or the number of reaction evaluations performed.
Triggers:
- 50 approved courses;
- 100 approved courses;
- 10 reaction evaluations made;
- 50 reaction evaluations made.
In the case of course-type resources, it is necessary to indicate at least one course to link to the challenge. The student can conquer the challenge more than once if more than one course is linked to the challenge. In the student’s challenge area, the number of times the student has conquered the challenge is indicated.
Actions in the course
Triggers:
- Start the course;
- Respond to reaction evaluation;
- Complete course in up to 1 day;
- Complete course in up to 5 days;
- Complete course in up to 10 days;
- Complete course in up to 30 days;
Course Progress
Triggers:
- Complete 50% of course contents;
- Complete 60% of course contents;
- Complete 70% of course contents;
- Complete 80% of course contents;
- Complete 90% of course contents;
- Complete 100% of course contents.
Course performance
Triggers:
- Pass the course with 50% performance;
- Pass the course with 60% performance;
- Pass the course with 70% performance;
- Pass the course with 80% performance;
- Pass the course with 90% performance;
- Pass the course with 100% performance.
In the case of track-type resources, it is necessary to indicate at least one track to link to the challenge. The student can conquer the challenge more than once if more than one track is linked to the challenge. In the student’s challenge area, the number of times the student has conquered the challenge is indicated.
Course Progress
Triggers:
- Complete 50% of track contents;
- Complete 60% of track contents;
- Complete 70% of track contents;
- Complete 80% of track contents;
- Complete 90% of track contents;
- Complete 100% of track contents.
Course performance
Triggers:
- Pass the track with 50% performance;
- Pass the track with 60% performance;
- Pass the track with 70% performance;
- Pass the track with 80% performance;
- Pass the track with 90% performance;
- Pass the track with 100% performance.
For this option to be available, the Library needs to be enabled in your environment. Library challenges are associated with categories and not just items. Therefore, it is mandatory to select the library category. The type of challenge defined here, therefore, applies to the items published/viewed from the category registered in the challenge. Items from other categories do not count towards the challenge. Library challenges have a single trigger, and the student conquers the challenge by publishing/viewing at least 1 item from the respective category. Additionally, the student can conquer the challenge more than once by publishing/viewing another item from the same category registered in the challenge.
By publication
Trigger:
- Publish 1 item.
By viewing
Trigger:
- View 1 item.
For this feature to be available, the forum needs to be enabled in the environment. The challenges only apply to the General Forum, and do not apply to the Community Forum or the Classroom Forum.
Posts
Triggers:
- Have 1 post favorited;
- Receive 10 likes on a post;
- Receive 100 likes on a post;
- Receive 500 likes on a post;
- Receive 1,000 likes on a post;
- Receive 10,000 likes on a post.
Comments
Triggers:
- Make 1 comment;
- Make 10 comments;
- Make 100 comments;
- Receive 10 comments;
- Receive 50 comments;
- Receive 500 comments.
Topics
Triggers:
- Publish your 1st topic;
- Have your topic viewed 100 times;
- Have your topic viewed 1,000 times;
- Have your topic viewed 5,000 times;
- Receive 10 responses in the topic;
- Receive 100 responses in the topic.
Once the type of challenge and trigger are defined, you can indicate which reward the student will receive upon completing the challenge. You can reward with a badge, points, koins, or even a combination of these. To learn more about rewards and how they work, access the Rewards area of this documentation.
Example:
In a certain first-access challenge to the platform, the student can earn a beginner badge. Upon completing a challenge of accessing the platform 50 times, the student receives another badge, and also receives 200 points and 50 koins.
You can also indicate if you want to apply rewards retroactively to students who have already completed certain tasks before the gamification registration. In this case, the system will calculate the score, distribute it, and also notify the student about this retroactive application, including information about the challenge criteria and the rewards that were attributed.
As optional advanced settings, it is possible to define an expiration for the rewards obtained with the challenge, which can be on a fixed date, or in a number of days after the reward is earned. It is also possible to indicate target audience and/or unit restrictions for that challenge. You can also add a previously registered personalized celebration.
Challenge Administration
In the challenge administration panel, it is possible to view the challenges already created, segmented by resource type, and for each registered challenge, we can see its image, date of last update, and status. In the panel, it is also possible to access the challenge editing and the listing of associations for that challenge. It can be associated with users and can be part of a mission. Additionally, it is possible to delete the challenge or even click to expand its information, thus viewing its type, trigger, and rewards, without the need to enter the editing area for this.
Missions are a set of challenges and/or other missions that the student must complete. As with challenges, the student can be rewarded with badges, points, and/or koins upon completing missions.
Mission Registration
When registering a mission, you need to decide a name for it, and you can add a description and image if desired. It is also mandatory to define the mission status, that is, whether it is active or inactive. Next, it is necessary to choose which challenges and/or missions will be part of this mission. It’s worth remembering that to get the mission score, the student will need to have completed all the challenges and/or missions that are included in it. As with challenge registration, you can decide which badges, points, and/or koins will be the reward, and you can also add expiration dates for the reward, as well as segment the mission by target audience or unit and add a personalized celebration.
Mission Administration
In the mission administration panel, it is possible to view the missions already created and, for each registered mission, view its image, date of last update, status, and the number of challenges and missions assigned to it. In the panel, you can also access the mission editing or even delete this mission. And you just need to click on the down arrow icon to expand the mission information, thus viewing the linked challenges and missions, as well as the rewards upon completion, without the need to enter the editing area for this.
Campaigns are used to create a kind of gamification within gamification. When creating a campaign, it is possible to define its own rules, distinct from general gamification, define a specific audience for participation, and also use its own ranking. Another characteristic of the campaign is that it has predetermined start and end dates.
Campaign Creation
To create a campaign, you need to give it a name, and you can add a description, banner, and image. It is necessary to indicate the campaign status, and define if there will be a campaign-specific ranking (“Enable campaign ranking” button). In addition, it is possible to indicate if it is a dynamic campaign, by enabling the button Dynamic campaign. By enabling this option, it is possible to change some campaign rules while it is in progress. To learn more about dynamic campaigns, access the documentation on the subject here. Informing the start and end date of the campaign is mandatory.
With these parameters defined, you can add challenges and missions to the campaign.
Challenges can be of the Course or Track type, and for them to be listed, the courses/tracks must be active on the platform. It is possible to select one or more courses/tracks, thus allowing the creation of batch challenges, that is, the created rules apply to all selected courses/tracks. When selecting one or more courses to create the challenge, you will be redirected to the editing page for this challenge. You must give a name to the challenge, and you can add a description and image to it. Then, it is necessary to define the rules for this challenge. If you choose to define rules by level, you must indicate what percentage of progress and/or achievement is required for each level created, as well as its respective reward.
In the example below, we have a configuration where the student, upon completing 50% of the course progress, receives 30 points, and is at the 3rd level. If the student achieves 70% of the course progress, they will receive 50 points and 10 koins, reaching the 2nd level. If the student achieves 70% achievement and 100% progress, they reach the 1st level and earn 100 points, 20 koins, and a badge.
If the option Allow level change is activated, the student can level up, until conquering the highest reward. In this case, when moving from the 3rd level to the 2nd, the student receives 20 points, as they have already received 30 points from the previous level, thus totaling the 50 reward points for the level. They also receive 10 koins. If they reach 100% course progress, and 70% achievement, they conquer the 1st level, and will receive an additional 50 coins, totaling the 100 coins granted by the challenge, plus 10 koins, totaling 20, and will also receive a badge.

It is also possible to define rules by approval/completion, indicating the minimum percentage of achievement and/or progress expected from the student. It’s worth remembering that, when adding both values, the student needs to reach both percentages, not just one of them. That is, if you indicate that the required achievement is 70%, and the progress is 100%, the student who reaches 100% progress, but has only 50% achievement will not have conquered this challenge.
When selecting the answer reaction assessment option, you indicate that, to complete the challenge, the student must answer the reaction assessment. Finally, it is possible to select the complete the course by: option, to indicate a deadline for course completion. When using more than one rule, the student will need to fulfill all of them to complete the challenge.
If you opt for rules that are not by level, you can indicate the reward that the student will receive upon completing the challenge, at the end of the registration. In the reward by level, the student will receive what was pre-established at each level, according to their performance.
When selecting a track as a challenge, only the by level rule can be configured.
Within the campaign, missions serve as a grouping of challenges, allowing the student to have more clarity on everything they need to do and providing an extra reward upon completing all listed challenges. To create a mission, you need to give it a name, and you can add a description and image. Next, it is necessary to add the challenges that make up this mission. In the challenge listing, only challenges that are not linked to other missions in the campaign will be displayed.
It is possible to add a deadline for completing the mission, as well as indicate the reward that the student receives upon completing this mission.
Next, you can specify the reward that the student will receive upon completing the campaign. They will only receive this reward after finishing all challenges and missions in the campaign. It is possible to define, within Advanced settings, an expiration deadline for the rewards earned, as well as segment the campaign by target audience and/or unit. Finally, you can configure the campaign goals. In Individual Goal, you can indicate a percentage of points that the student must achieve to receive the indicated reward. This percentage is based on the total points that the student can obtain by completing the challenges and missions of the campaign. If you have the “Enable collective goal in the campaign” option enabled in the campaign settings, filling in the Collective Goal is mandatory. In it, you indicate the number of points that students must obtain, summing all of them, to receive the corresponding reward.
The ranking is the space where participants can view their position in relation to others, based on their scores. There are three types of rankings on the platform, and a single student can participate in and view one or more types of ranking. It is also possible to create a ranking visible only to platform administrators. To do this, when creating a ranking, simply disable the “Ranking visible to students” option.
Check below the particularities of each of the available rankings:
In this format, all students participating in the ranking are listed. They are positioned in the list based on their number of points, that is, the student with the most points will be the first in the ranking, and so on. When registering a general ranking, you must give it a name and can add a description. Then, simply indicate if the ranking is active and if it will be visible to students.
It is also possible to enable a period for the ranking. In this case, it is necessary to indicate the start and end date of the ranking, and only the scores that students obtained during the configured period will be counted in the ranking.
Finally, you can indicate the target audience and/or units that make up that ranking. If no target audience or unit is selected, the ranking will encompass all students on the platform.
The objective of this ranking is to classify the units with the best score, based on the scores of their students. For this, the platform uses a calculation known as normalized score. This calculation works as a benchmark and ensures that units are evaluated fairly, taking into account the size of the unit. It is worth re-emphasizing that the calculation takes into account the number of active students. When viewing the ranking, it will display in the list the name of the participating units and the result of their respective normalized score calculations, with the first place being the unit with the highest normalized score value.
When registering a Unit vs Unit ranking, you must give a name to the ranking and can add a description. Then, you must indicate the ranking status (active/inactive), and it is possible to select whether the ranking will be visible or not to students. When enabling a period, it is necessary to indicate the start and end date of the ranking, and only the scores that students obtained during the configured period will be counted in the ranking.
Following the registration, it is necessary to inform which units make up that ranking. Then, it is possible to indicate which units will be able to view this ranking, and whether this viewing will be restricted to platform managers/administrators (activate the Restricted to managers option), or will also be released for students.
Formula for calculating the normalized score:

Example of Unit vs Unit Ranking:
Unit Name | Total points of the unit | No. of employees in the unit |
|---|---|---|
Florianópolis | 3780 points | 47 employees |
São José | 4060 points | 89 employees |
Itapema | 5090 points | 173 employees |
| Average of total number of employees: | 103 employees |
Ranking Position | Unit Name | Normalized Score Result |
|---|---|---|
1st Place | Florianópolis | 6084.68 points |
2nd Place | Itapema | 4994.20 points |
3rd Place | São José | 4367.79 points |
The Ranking by Unit presents a list of students from selected units. When registering a ranking by unit, you must give it a name and can add a description. Indicate the ranking status (active or inactive) and whether it will be visible or not to students. It is also possible to enable a period for the ranking. In this case, it is necessary to indicate the start and end date of the ranking, and only the scores that students obtained during the configured period will be counted in the ranking.
Next, define which units will participate in the ranking. You can select one or more units. By default, even units that are not participating in the ranking can view it. It is possible to restrict the viewing of the ranking only to users of the selected units by activating the option Consider only people directly associated with the selected units in the ranking registration. It is also possible to segment by target audience. It is worth noting that the platform takes into account both factors combined to compose the ranking, that is, to be included in the listing, the student must belong to the unit and the target audience indicated in the ranking registration.
Example:
João belongs to the analysts target audience and the central unit.
Maria belongs to the analysts target audience and the branch unit.
Leila belongs to the supervisors target audience and the branch unit.
When creating a ranking by unit, and segmenting it by the branch unit and analysts target audience, only Maria would be part of this ranking.
In the ranking administration screen, you can view the list of participants and their respective placements, without the need to access through a student profile. It is also possible to make edits to the ranking, remembering that changes in unit and/or target audience can directly impact the order of placement of users. The platform also allows the deletion of the ranking, if necessary. The medals that appear in front of the names of the top three are standard in the system and cannot be changed.
The ranking is automatically updated if any participant has gained or lost points. To view the most recent listing, simply refresh your browser. This way, the platform displays the already updated ranking positions.
The store is the place where the student can exchange their koins for prizes. The available prizes are the responsibility of the platform administrator, and can be both physical items, such as notebooks, backpacks and t-shirts, as well as prizes such as trips, time off or gift vouchers. Within the store administration panel, it is possible to register categories and products, control orders and inventory, and manage offers. Learn more about each functionality below:
The category registration serves to facilitate the organization and segmentation of store products. Categories are also commonly used in report analyses. To register a category, simply give it a name and, if necessary, you can add a description. On the category administration page, you can view the number of products linked to each category. In this case, the quantity refers to the number of types of products linked, and not to the inventory itself.
Example:
If I have a category called office supplies registered, and my products in this category are backpack, notebook and pencil, even if I have two backpacks, five notebooks and no pencils in stock, three products will be listed in this category.
Still on the category administration screen, you can edit the name and description of the category, as well as delete it. Even when deleting a category, the products related to it remain registered, only losing the link with the category in question.
Products are the items that will be displayed in the store for students to exchange with their koins. On the product management screen, you can view the registered products, the date of the last product update, the cost for the student (in koins), the remaining stock, and by expanding the product information, you can also see if it is a physical or virtual type, the initial stock quantity, and if this product is part of any offer. Additionally, it is possible to edit or delete the product.
When adding a new product, it is necessary to provide the name and you can add a description and image of that product. You need to indicate the product status (active or inactive), and specify if the product is physical or digital. This segmentation is important because physical products have a shipping control, while virtual ones are automatically marked as delivered when acquired by the student. It is also necessary to add the initial available quantity of the product. You can add the unit value of the product, which will not be displayed to the student but can assist during report analyses. The value that will be displayed and charged to the student should be filled in the Koins field. Next, you can add a category to the product and also add instructions for exchanging this order.
You can also use keywords to facilitate product search in the store or even segment by target audience and/or unit. It is worth noting that if the option “Enable product offers in the store” is activated in the settings, when registering a new product, it does not appear in the store yet. It needs to be linked to an offer.
The order management area is used to record and manage orders placed in the store. It displays the order number, the name of the user who requested the exchange, the product, the amount of koins the user used for the exchange, the request date, the order status, and the action execution button (pencil). The order statuses are Redemption completed, In stock separation, Order shipped, Delivered to destination, and Canceled.
When requesting a virtual product, the order is immediately marked as delivered to the student. For physical products, you must update the status by clicking on the edit pencil. As soon as the order is placed, you can proceed with its separation or cancel it. While the product status is Order placed or In separation, the student can cancel the order. From the moment the product is marked as Order shipped, it is no longer possible to cancel it. The delivery address is displayed when clicking on View Details. This address can be the student’s address, registered in their profile, or the student’s allocation unit, if the parameter “Use the student’s Unit as the product delivery location” is activated in the gamification settings. If the student is allocated to a root unit that contains child units, the system will, by default, set the root unit as the delivery address. The administrator can select another child delivery unit if necessary by clicking on Select Unit. Only the units where the student is allocated will be available.
The student must confirm the delivery directly through the store page, accessing their ongoing orders, clicking on the action pencil, and then clicking on Confirm delivery and Confirm in the confirmation message. If the option “Product redemption can only be confirmed by the Student after the product is sent by the Administrator” is activated in the store settings, the student can only confirm the delivery when the product status is Order Shipped. For the product to be marked as Delivered to destination, it is always the student who must confirm the delivery.
The stock management area is where you can control the entry and exit of goods, as well as view the history of item movement and total available balance. It’s worth remembering that when a student places an order, that item is automatically removed from the stock. When making a stock entry, you select the product to be moved, indicate whether it’s an entry or exit, the quantity, can add a unit value that will not be displayed to the user, and can add an observation to the movement.
Offers are a way to include registered products in the student’s store. They serve to create personalized offers based not only on stock quantity but also during a specific period of time. To use them, the option “Enable product offers in the store” must be enabled in the store settings. With this option enabled, products will only appear in the store when they are associated with an offer and have available stock.
When adding a new offer, you must give it a name. This name will not appear to the student. Next, it is necessary to inform the product that will be linked to the offer. In this case, even if the product is out of stock or inactive, it will be added to it. However, in the case of inactive products, the offer will not appear in the store, even if it is active. And in the case of out-of-stock products, the offer will be displayed in the store, but without the available stock balance, and if the student tries to redeem this product, the message “It was not possible to redeem the product, as the product has no available stock” will be displayed to the student. If there is more than one active offer for the same product, the system displays the oldest offer until it ends, either by the end of the offered quantity or by deadline. If there is another offer for this same product, active and valid, this offer starts to appear in the student’s store.
After selecting the product, you can indicate the amount of koins needed for the exchange of the product. If you leave the field blank, the platform will assume that the exchange value is the one listed in the product registration. Next, you can select if the offer type will be by period or by quantity. When selecting By period, you must define a start and end date for the offer. Then, you can indicate if you want that offer to appear in advance in the student’s store by activating the option Display in store - Coming Soon , and you can also indicate if you want the product, when expired, to still be visible by activating the option Display in store - Expired. When selecting the By quantitytype, you just need to inform the number of times that product can be acquired through that offer. It’s worth remembering that the platform will always respect the product’s stock quantity. This means that even if I offer 50 notebooks, if I only have 10 notebooks registered in stock, when trying to make an exchange for a product that has an offer but no stock, the student will also receive the message “It was not possible to redeem the product, as the product has no available stock”. Finally, you must indicate if the offer is active or inactive, and you can inform the target audience and/or units to segment the offer.
In the offer management panel, you can view the offer name, the koin value for redemption, the offered product, the total number of offers made available, how many products were redeemed, the remaining balance of the offer, and the number of products available in stock. For period offers, the number of offered products is presented as zero, and the offer balance is left blank. By clicking on the Edit Pencil, you can change the offer name, product, offer status, and target audience and/or units. When changing the product of the offer, all its other characteristics remain. That is, if you did not inform a koin amount for the offer, the platform will use the koin value from the product registration as a base. Now, if you have informed a value for the offer, even if the product is exchanged for another with a different value in the registration, the offer value will remain the same. The offered quantity will also be maintained, as well as the deadline. It is also possible to delete the offer if necessary.
Here are all settings and parameters related to gamification.
These are the settings that encompass the entire gamification system.
- Who views the Gamification:
Here you select the target audience and/or units you want to participate in the gamification. Only students who are part of the segmentation will be able to view the gamification. - Enable points on cards (Student Home)
When activating this option, the score that can be obtained with the courses is presented on the course cards on the student’s home page. - Enable achievement statement report for the student
With this feature activated, the student can view a report of their achievements. If disabled, the student can only view their total balance of points and koins earned, without a detailed statement. - Enable celebrations
By enabling celebrations, you allow the student to receive notification messages when conquering challenges, missions, and levels.
These are the settings related to the point distribution system.
- Enable point recovery after expiration
This option enabled allows the student to recover points after they expire. This happens when there is a challenge/mission that rewards with points that expire within a certain period of time. If the student completed the mission/challenge, their points were expired after a certain period of time, when redoing the mission/challenge, the student receives these points again.
These are the settings for the gamification store.
- Enable gamification store (Product redemption)
By activating this option, the point exchange store is enabled, and allows the student to access it. If the option is deactivated, the other store settings are inactive, the student does not have the option to view the store, and the administrator cannot perform store registrations. - Product redemption can only be confirmed by the Student after the product is sent by the Administrator
This option allows the student to indicate that they have received their physical product only when it is marked as “Sent” by the administrator. It is useful for situations where employees cannot simply pick up their orders at a fixed location and need to wait for shipping. When this option is disabled, the student can indicate that they received the product immediately after requesting it. - Enable product offers in the store
Offers make it possible to make the same product available in the store in different ways and with different values. With this option enabled, even if the product has been registered, it will not appear immediately in the store. For it to be available to the student, the product will need to be linked to an offer. If disabled, when registering a product, it already appears in the student’s store. - Use the student’s Unit as the product delivery location
By activating this feature, it will not be possible to use the student’s address as the delivery address. Instead, the units registered on the platform will be used.
These are the settings that encompass the entire gamification system.
- Validate campaign period conflicts
When this option is enabled, the platform validates if there is already a campaign within the selected period for creating a new campaign, not allowing the saving of that campaign. When disabled, it is possible to create more than one campaign within the same period. - Enable collective goal in the campaign
This option enabled makes it mandatory to provide a collective goal when registering a new campaign. If disabled, this option is not available when creating the campaign.
It is possible to add custom Widgets to the student’s home page. Widgets can be added through JSON code in the menu Settings > General Configurator > Home. There are four Widget models available, and you can select two to three to insert on the student’s page:
- Campaign Widget
This Widget shows the list of campaigns available to the student, with their respective icon, name, and access button. The JSON code is:
{
"gamificacao":{
    "corFundoCarrosel":"",
    "widgets":[
        {
            "title":"Campanhas Ativas",
            "subtitle":"",
            "btnTitle":"Ver tudo",
            "template":"portal/views/home/includes/campanhas-widgets-include.tpl.html",
            "corFundoCarrosel":""
        }
    ]
}
}- Statement and Levels Widget
This Widget displays the student’s avatar, their level, progress bar, the number of points missing to reach the next level, the student’s total points and koins, as well as the points and koins that will expire in the current month. The JSON code is:
{
"gamificacao":{
    "corFundoCarrosel":"",
    "widgets":[
        {
            "title":"Meu Extrato",
            "subtitle":"",
            "btnTitle":"Ver tudo",
            "template":"portal/views/home/includes/extrato-de-pontos-widgets-include.tpl.html",
            "corFundoCarrosel":""
        }
    ]
}
}- Challenges Widget
This Widget shows the list of challenges, with their respective icons. By hovering over the icon, the student can view basic information such as name, challenge type, and rewards. By clicking on the Widget title, the student will be taken to the Achievements tab, where they can view all levels and challenges already conquered and available for conquest. The JSON code is:
{
"gamificacao":{
    "corFundoCarrosel":"",
    "widgets":[
        {
            "title":"Missões",
            "subtitle":"",
            "btnTitle":"Ver tudo",
            "template":"portal/views/home/includes/missoes-widgets-include.tpl.html",
            "corFundoCarrosel":""
        }
    ]
}
}- Ranking Widget
This Widget displays the ranking of participants. If the student participates in more than one ranking, the last created ranking will always be displayed. To view all rankings, simply click on the ranking name, and the student will be redirected to the rankings page. The JSON code is:
{
"gamificacao":{
    "corFundoCarrosel":"",
    "widgets":[
        {
            "title":"Ranking",
            "subtitle":"",
            "btnTitle":"Ver tudo",
            "template":"portal/views/home/includes/ranking-widgets-include.tpl.html",
            "corFundoCarrosel":""
        }
    ]
}
}- Example using three Widgets
JSON code:
{
"gamificacao":{
    "corFundoCarrosel":"",
    "widgets":[
        {
            "title":"Meu Extrato",
            "subtitle":"",
            "btnTitle":"Ver tudo",
            "template":"portal/views/home/includes/extrato-de-pontos-widgets-include.tpl.html",
            "corFundoCarrosel":""
        },
        {
            "title":"Missões",
            "subtitle":"",
            "btnTitle":"Ver tudo",
            "template":"portal/views/home/includes/missoes-widgets-include.tpl.html",
            "corFundoCarrosel":""
        },
        {
            "title":"Ranking",
            "subtitle":"",
            "btnTitle":"Ver tudo",
            "template":"portal/views/home/includes/ranking-widgets-include.tpl.html",
            "corFundoCarrosel":""
        }
    ]
}
} - Student’s home page view:

 English
 Español