English
 Español
Marketplace Konviva
O Marketplace Konviva permite a integração de conteúdos de um ambiente de aprendizagem com diversos outros ambientes, disponibilizando catálogos de cursos e trilhas de forma automatizada e escalável. Esse recurso elimina a necessidade de replicar manualmente os conteúdos em cada ambiente, otimizando a distribuição de treinamentos e viabilizando estratégias comerciais em larga escala.
Entendendo o funcionamento do Marketplace Konviva
Para compreender o recurso, é importante conhecer e identificar os dois papéis envolvidos:
- Tenant Provedor: É o ambiente onde os cursos e trilhas são criados e publicados. Ele define quais conteúdos serão ofertados e para quais clientes.
- Tenant Cliente: É o ambiente que consome os conteúdos publicados pelo provedor. Esses conteúdos são exibidos no ambiente do cliente como um “espelho” do catálogo do provedor.
De forma resumida, o provedor disponibiliza os cursos e/ou trilhas para que os clientes possam matricular seus alunos. Os alunos, por sua vez, ao serem matriculados em cursos ou trilhas através da plataforma do cliente, são redirecionados aos conteúdos que estão hospedados no ambiente do provedor. Toda a gestão e edição do conteúdo permanece centralizada no provedor. Entretanto, as informações relativas ao desenvolvimento do aluno nesses conteúdos ficam disponíveis tanto para o provedor quanto para o cliente.
Como configurar a integração?
Para iniciar a integração, é necessário solicitar que o ambiente seja habilitado como provedor de conteúdo marketplace, cliente, ou ambos. Essa solicitação pode ser feita para o time de suporte.
Instruções à equipe de suporte:
A configuração deve ser feita acessando o menu Configurações > Configurador Geral > Konviva Marketplace. Nesta guia o usuário suporte deve habilitar as configurações, de acordo com a necessidade de cada ambiente de aprendizagem.
Para que a integração funcione corretamente, o provedor utilizará unidades de negócio como forma de indicar quais clientes que podem realizar a integração de seus conteúdos. Sendo assim, é necessário criar uma unidade de negócio para representar cada cliente do provedor.
Com o ambiente já habilitado como provedor, durante a criação/edição da unidade de negócio, a opção “Habilitar Token Marketplace Konviva” estará disponível. Habilitando o parâmetro, um token será gerado. Este token deve ser disponibilizado ao cliente, para que possa ser inserido nas configurações do Marketplace correspondente à esta unidade.
Uma vez ligado o token de cliente no provedor, e adicionado esse token nas configurações do cliente, a integração do Marketplace entre os ambientes estrá ativa. Ao desligá-la a integração é suspensa.
Como funciona a integração?
Serão integrados somente cursos e trilhas ativos que estiverem dentro de um catálogo. Quando o provedor publica esse catálogo para uma unidade cliente, esse catálogo é espelhado automaticamente no ambiente do cliente que ativou o token correspondente.
Nas Pemissões de Acessos das configurações de catálogos do provedor, alguns parâmetros precisam ser considerados:
- Catálogos habilitados como “Público” não podem ser integrados;
- Caso não haja nenhuma unidade selecionada, este catálogo será disponibilizado para todos os clientes;
- Caso existam unidades selecionadas, o conteúdo será disponibilizado apenas para estas unidades.
Importante!
A integração entre provedores e clientes NÃO leva em consideração as restrições de público-alvo, mesmo que estas sejam relacionadas às unidades de negócio. Sendo assim, toda a segmentação de distribuição de conteúdos em catálogos deve ser feita utilizando a seleção de unidades de negócio. Recomenda-se então a criação de catálogos exclusivos para o uso no Marketplace.
Quando o catálogo é integrado no cliente, ele fica disponível para todos os seus alunos. Caso o administrador da unidade cliente queira segmentar o acesso aos cursos e trilhas, é possível adicionar unidades e/ou públicos-alvo para restringir o acesso. Essa configuração deve ser feita na edição de catálogo do ambiente do cliente.
Administração de conteúdos marketplace
Ao compartilhar um catálogo, apenas os cursos avulsos cadastrados no provedor na modalidade à distância serão integrados. Para integrar outras modalidades de cursos, eles precisam estar dentro de trilhas para, aí sim, serem integrados.
O cliente consegue visualizar os cursos e trilhas, realizar matrículas de alunos e acompanhar o progesso de alunos diretamente de seu ambiente. Entretanto, as trilhas, cursos e turmas integradas não podem ser editadas no ambiente do cliente, e ele também não consegue criar novas turmas em cursos integrados do provedor. Todos os cursos integrados, independentemente da modalidade que estejam cadastrados no provedor, são indicados no cliente como conteúdo externo. Eles não aparecerão na listagem de cursos do ambiente do cliente, mas sim na área de Conteúdo Externo.
Nesta área o cliente consegue visualizar os cursos, seus status, o provedor responsável pelo curso e, ainda, visualizar o curso e as turmas associadas.
Acesso aos conteúdos
O armazenamento dos conteúdos continua acontecendo no ambiente do provedor, não sendo migrados para o repositório do cliente.
São integrados no cliente apenas os dados cadastrais e landing pages de cursos e trilhas. Sendo assim, no ambiente do cliente, o aluno visualiza apenas estas informações. Ao clicar em “estudar”, ele é redirecionado ao player do ambiente do provedor, através de um login SSO. Uma vez logado no provedor, o aluno poderá navegar apenas dentro dos conteúdos daquele curso ou trilha específico. Ao fechar o conteúdo ou concluir o curso, o aluno é redirecionado ao ambiente do cliente. Por conta do SSO, o aluno não percebe essa alteração entre ambientes.
Particularidades de acesso
-
Nos cursos cadastrados com a modalidade prova no provedor , o aluno acessará diretamente a sala de aula, desconsiderando a liberação por horário e/ou aplicação da prova com o Easy Proctor, mesmo que essas configurações estejam ativas no provedor.
-
Nas modalidades presencial, blended e/ou síncrono, o provedor consegue configurar como critério de aprovação a frequência. Como todos os cursos são cadastrados no cliente como conteúdo externo, não haverá integração de notas e/ou frequência. Ao integrar a matrícula, a plataforma registrará no cliente o status de aprovação do aluno (aprovado ou reprovado), seu percentual de aproveitamento e seu status (matriculado ou concluído) no respectivo curso.
-
Caso seja configurado um termo de aceite no provedor, e o aluno optar por não aceitar, ele será direcionado para tela de login do provedor. Entretanto, o aluno não conseguirá fazer o login, pois seu acesso é diferente do acesso ao ambiente do cliente.
-
Recursos de trilha publicados diretamente nas trilhas (links, PDF, podcasts, etc), terão apenas o cadastro integrado, mas não serão listados no repositório do cliente. A integração ocorre para que possam ser exibidos nos relatórios de trilhas.
-
Recursos de aprendizagem que estiverem presentes em cursos (scorm, videos, avaliações, certificados, etc) não serão integrados. Apenas os dados cadastrais do curso e das turmas são integrados.
-
Turmas configuradas com fluxo de solicitação de matrícula não serão integradas.
Gestão de matrículas e relatórios
A gestão de matrículas é feita no ambiente do cliente, sendo enviadas ao provedor apenas as matrículas realizadas em cursos integrados via marketplace. Entretanto, para garantir que tanto o provedor quanto o cliente consigam acompanhar o progresso e os relatórios de forma sincronizada, são integrados em ambos os ambientes os dados de usuários, cursos, turmas, matrículas, trilhas e recursos. Logo, matrículas e andamento/aproveitamento nas trilhas são registradas e sincronizadas em ambas as bases.
Quando um aluno se matricula em um curso no ambiente do cliente, é criado automaticamente um cadastro e matrícula desse aluno no ambiente provedor, atrelado à respectiva unidade de negócio. Para evitar conflitos de informação, caso um mesmo aluno esteja cadastrado em mais de um cliente, o cadastro no provedor é feito utilizando o seu login + MKP + ID da unidade do aluno.
O aluno João, CPF 123.456.789-10, possui cadastro no cliente A e no cliente B. Em ambos os clientes, o identificador de usuário é o CPF. No provedor, o ID de unidade do cliente A é 1234, enquanto do cliente B é 5678.
Quando o João fizer uma matrícula em um curso de marketplace através do cliente A, ele será cadastrado no provedor como 12345678910.MKP.1234. Ao realizar uma matrícula em um curso do cliente B, será criado um novo usuário no provedor, com o identificador 12345678910.MKP.5678. Observe que os identificadores do aluno no provedor diferem de acordo com a respectiva unidade do cliente.
O fluxo de integração de matrículas é sempre do cliente para o provedor. Sendo assim, caso um aluno seja matriculado em um curso no ambiente provedor, ele não será replicado no ambiente do cliente.
Não existem limites de quantidade usuários ou matrículas por cliente. A única restrição existente é o bloqueio de mais de uma matrícula em andamento de um mesmo usuário no mesmo curso.
Certificados
É possível criar e adicionar certificados aos cursos integrados ao Marketplace Konviva, permitindo que os alunos possam fazer o download e a impressão de seus certificados ao finalizar seus cursos e se encontrarem com o status aprovado.
Para que o certificado do curso seja disponibilizado para o Tentant Cliente, é necessário que o Tenant Provedor associe ao curso integrado.
It is possible to register a certificate using the Course certificate option in Repository > Certificate > Register and filling in the following fields:
- Name: in this mandatory field it is necessary to define the name of the certificate to be created;
- Status: here it is possible to define whether the certificate will be active or inactive;
- Unit: in the Select unit button it is possible to define which units among those registered in the system will have permission to manage the certificate;
- Certificate phrases: this section presents the integration tokens that should be used to create the written text of the certificate. When using a token (text within two hashtags, e.g.: #NAME#), the system will automatically replace the information with the data of the student who will receive the certificate;
- Phrase: this field allows editing the certificate text, where it is possible to describe the information that will be presented in the final certificate.
It is essential to use the certificate phrase tokens so that the final documents reflect the user data saved in the system database.
- Image: this section allows defining the background image of the certificate in the Select file button
Note For the image to have a good resolution for printing on A4 paper, the dimensions in pixels should be: 3508 (width) x 2482 (height) within the formats PNG, JPG or GIF.
Once the process is finished, it is possible to download a preview of the certificate for visualization in the “View certificate” button. If the certificate is correct, just click on Save.
Once the certificate is registered, it is possible to add them to a course so that they are available for download/printing by approved users at the end of the course. This process can be done in Learning > Courses > Manage.
This page presents the list of courses registered in the system, allowing them to be edited in the edit button (). Once the desired course is selected, simply go to section 3 — Add course content and click on Add content > Certificate. This page will open a new section where the administrator user can fill in the following fields:
- Certificate title: this mandatory field requires an identification for the certificate that will be associated with the chosen course;
- Add certificate: here it is necessary to select a certificate registered in the repository to associate with the course in the Select from repository button. It is also possible to use the link next to Go to certificate registration and register a new certificate, if necessary;
- Write a description for the certificate: this section allows writing a running text description for the certificate, if desired
- Certificate back settings: if enabled, this button allows selecting between three types of layout (one, two or three columns) and inserting information that will be presented on the back of the certificate. This text has integration with certificate tokens.
Once the process is finished, just click on Add
Unlike certificates for courses promoted directly by the Konviva platform, certificates can be released for access/download even if the option Release only if the reaction evaluation has been answered is enabled, since courses integrated through the Marketplace do not have a reaction evaluation associated with their integration.
Once enabled, certificates can be viewed by the Client Tenant on the course history page by clicking the Certificate button
Important
- Access to certificates will be available only to users who have achieved the Approved status. If the user’s status is Failed, the option will not be visible;
- Certificates for Tracks or Classes integrated via Marketplace will not be available for issuance and download; since the functionality covers only course certificates;
- It is not possible to issue or print certificates through the Administrator view.
What if the integration is terminated?
If the provider deactivates an integration token, the corresponding catalog is automatically removed from the client’s environment. Tracks and courses are deactivated, and new enrollments are blocked. However, the history of those who have already enrolled is maintained in both environments, allowing for normal consultation and report generation.
The same occurs if the course, track or catalog is deactivated or deleted by the provider.
Data migration from provider environment to client
There are scenarios prior to the marketplace feature, where client students needed to be registered in the provider environment so they could access the available content. With the Konviva Marketplace feature active, these students can have their users registered directly in the client’s learning environment and still consume content provided by the provider.
To adjust this situation, we developed the possibility to automate the migration of users registered in the provider to the client environment, as well as the enrollment history of these users. This way, all student registrations, previously registered in the provider, migrate to the client environment, while the provider keeps the updated registration, following the marketplace user integration standard.
The student João, CPF 123.456.789-10, was previously registered in the provider, and his login was the CPF. As João belongs to client A, his user is migrated to this environment, and he starts using the CPF as login directly in client A’s learning environment. In the provider, João’s registration is updated to 12345678910.MKP.1234.
The migration of users and enrollment history must be requested from the support team. Before performing it, it is necessary to have the marketplace configuration between client and provider already parameterized. When migrating users, the enrollment history of the last 30 days is also migrated. Information related to completed and ongoing enrollments of courses active at the time of migration is integrated. Enrollments for courses that are not from the marketplace will not be migrated, as well as enrollment data for users who were not previously integrated into the client.
It is possible to indicate a period longer than 30 days to perform the data migration. In this case, it is necessary to inform the support team from which date the data should be considered. Once the user migration is done and the period for enrollment data migration is informed, the system will execute the search for this history only once. To generate a new execution, it is necessary to indicate a new date.
Migration instructions - Available only for support
Attention!
Before performing the migration, it is necessary to have previously registered the marketplace integration between provider and client. When executing the steps below, users will be imported into the client environment and the same users will be updated in the provider environment, changing their identifier login and adding the user’s external ID, thus creating the PROVIDER - CLIENT relationship.
1 - To perform user migration, it is necessary to add the attached script to the CLIENT platform. Before adding the file, it is necessary to change some information, as per the instructions below:
Click on the example image to enlarge:
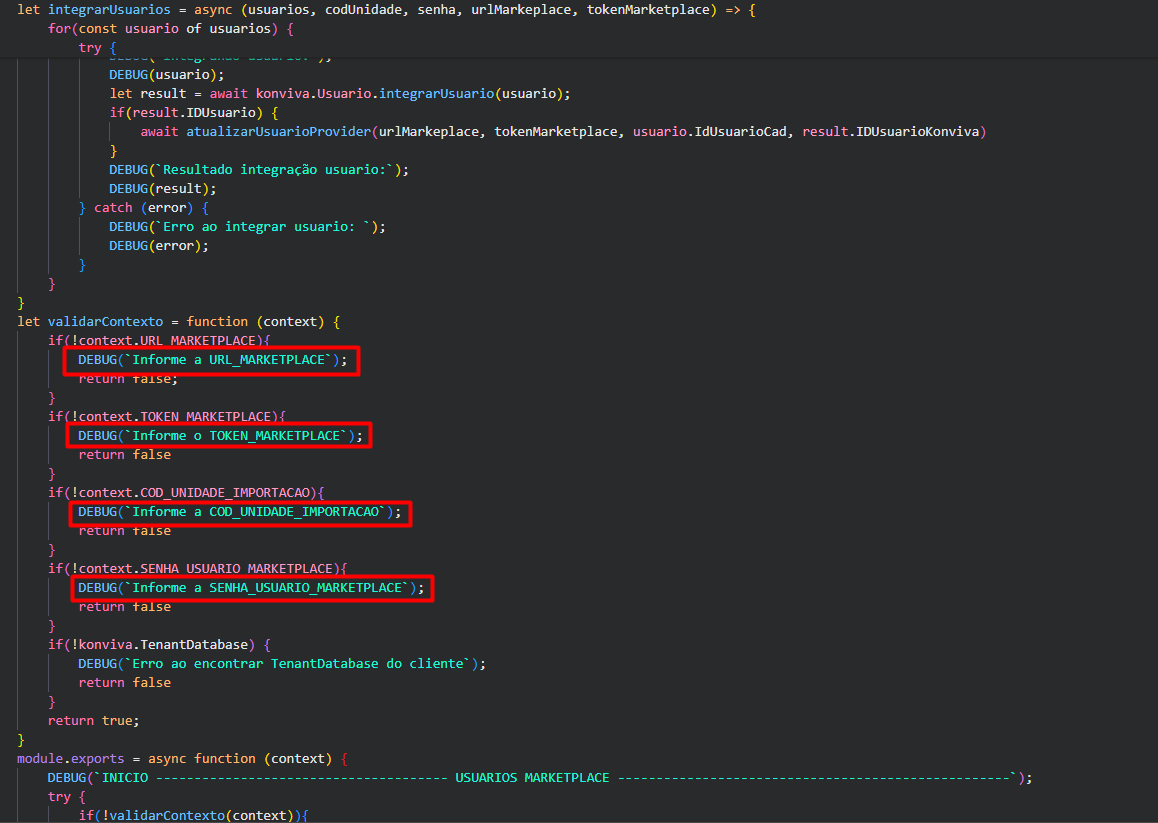
URL_MARKETPLACE:Marketplace URL (provider address);TOKEN_MARKETPLACE:Marketplace unit token (token that the provider enables in the unit that wants to mirror the catalogs);COD_UNIDADE_IMPORTACAO:Code of the client unit to which the students will be associated. The client must define, among its registered units, to which one - and only one, the provider’s users should be integrated. In this case, it is mandatory that the client fills in the code field when registering a unit;SENHA_USUARIO_MARKETPLACE:Default password that the client defines. The user will be asked to change it on first access.
Click the button below to download:
User migration fileconst konviva = require('konviva');
function DEBUG(message) {
console.log(message);
}
let getUsuariosByTokenProvider = async (urlMarkeplace, tokenMarketplace) => {
try {
let result = await konviva.Marketplace.getUsuariosMarkeplace(urlMarkeplace, tokenMarketplace);
return result
} catch (error) {
DEBUG(`Erro ao executar getUsuariosByTokenProvider: ${error}`);
throw error;
}
}
let validateCadastroUsuario = (usuario) => {
if(usuario.TenantMarketplace) {
return false;
}
if(usuario.Situacao != 'ATIVO') {
return false;
}
return true;
}
let atualizarUsuarioProvider = async (urlMarkeplace, tokenMarketplace, idUsuario, idExterno) => {
try {
DEBUG(`Atualizando usuario ${idUsuario} com idExterno ${idExterno}`);
await konviva.Marketplace.updateUsuarioMarketpalce(urlMarkeplace, tokenMarketplace, { id:idUsuario, idExterno, tenantClient: konviva.TenantDatabase });
}catch (error) {
DEBUG(`Erro ao executar atualizarUsuarioProvider:`);
DEBUG(error);
}
}
let integrarUsuarios = async (usuarios, codUnidade, senha, urlMarkeplace, tokenMarketplace) => {
for(const usuario of usuarios) {
try {
if(!validateCadastroUsuario(usuario)) {
continue;
}
usuario.CODUnidadeAluno = codUnidade;
usuario.ForcarAtualizacaosenha = true;
usuario.IsMarketplace = true;
usuario.Senha = senha;
if(usuario.DataCadastro) {
usuario.DataCadastro = new Date(usuario.DataCadastro).toISOString();
}
if(usuario.DataNascimento) {
usuario.DataNascimento = new Date(usuario.DataNascimento).toISOString();
}
DEBUG(`Integrando usuario:`);
DEBUG(usuario);
let result = await konviva.Usuario.integrarUsuario(usuario);
if(result.IDUsuario) {
await atualizarUsuarioProvider(urlMarkeplace, tokenMarketplace, usuario.IdUsuarioCad, result.IDUsuarioKonviva)
}
DEBUG(`Resultado integração usuario:`);
DEBUG(result);
} catch (error) {
DEBUG(`Erro ao integrar usuario: `);
DEBUG(error);
}
}
}
let validarContexto = function (context) {
if(!context.URL_MARKETPLACE){
DEBUG(`Informe a URL_MARKETPLACE`);
return false;
}
if(!context.TOKEN_MARKETPLACE){
DEBUG(`Informe o TOKEN_MARKETPLACE`);
return false
}
if(!context.COD_UNIDADE_IMPORTACAO){
DEBUG(`Informe a COD_UNIDADE_IMPORTACAO`);
return false
}
if(!context.SENHA_USUARIO_MARKETPLACE){
DEBUG(`Informe a SENHA_USUARIO_MARKETPLACE`);
return false
}
if(!konviva.TenantDatabase) {
DEBUG(`Erro ao encontrar TenantDatabase do cliente`);
return false
}
return true;
}
module.exports = async function (context) {
DEBUG(`INICIO -------------------------------------- USUARIOS MARKETPLACE ---------------------------------------------------`);
try {
if(!validarContexto(context)){
return;
}
const usuarios = await getUsuariosByTokenProvider(context.URL_MARKETPLACE, context.TOKEN_MARKETPLACE);
await integrarUsuarios(usuarios, context.COD_UNIDADE_IMPORTACAO, context.SENHA_USUARIO_MARKETPLACE, context.URL_MARKETPLACE, context.TOKEN_MARKETPLACE);
} catch (error) {
DEBUG(`Erro ao executar SCRIPT do marketplace!`)
}
DEBUG(`FIM -------------------------------------- USUARIOS MARKETPLACE ---------------------------------------------------`)
2 - After changing the information and saving the new file, access Settings > Integrations> Server Side Script > Add Script. Configure the script registration as follows:
- Script name: Name that identifies the script function. Example: Marketplace user migration;
- Access code: 1;
- Engine: Konviva Script - Javascript Node;
- Timeout (seconds): 30;
- Priority: Medium.
In Script File(JS), click on upload file and add the script modified in the previous step. Save the settings.
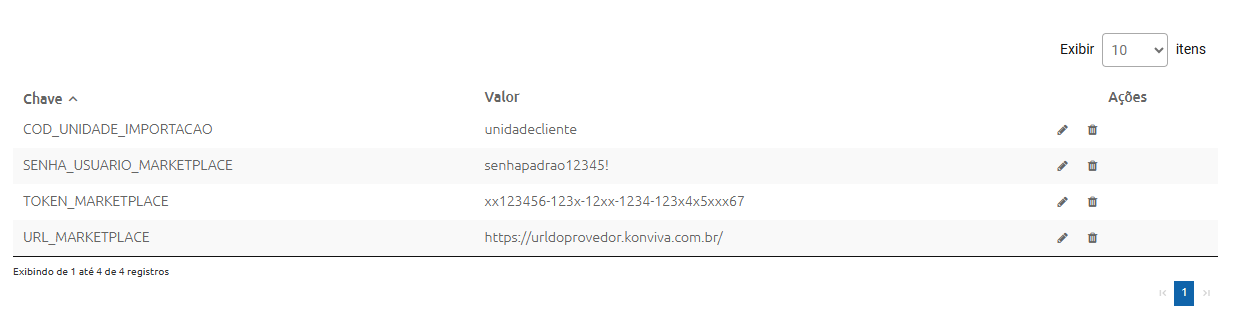
3 - The same information used in the script modification (step 1) must be inserted as GLOBAL PARAMETERS in Settings > Integrations> Server Side Script > Global Parameters. By clicking on add parameter, you should add each information key, and its respective value. Click on the example image to enlarge:
4 - Once the global parameters are configured and the script is filled with these parameters, the added script should be executed by clicking on the execute script icon  in the actions column.
5 - Finally, check if the operation was successful by verifying the execution status by clicking on the execution log icon  , also available in the actions column.
Once the marketplace is enabled, the system automatically integrates enrollments from the last 30 days. If it is necessary to migrate a retroactive period longer than 30 days, the migration date functionality is used.
To perform data integration, the marketplace connection between client and provider must be previously configured, and users must have been imported beforehand. With these configurations in place, in the client environment, access the menu Settings > General Configurator > Konviva Marketplace.
In the list of registered providers, identify the provider from where the enrollment data will be migrated and click on the edit pencil  . Simply fill in the completion history date and click on “Save”. The system will execute the data search and integration only once. If it is necessary to perform a new data query, the field must be edited again.
Only completed and ongoing enrollments of active users, enrolled in active courses and integrated in the marketplace catalog will be migrated. Enrollment data for other courses that are not integrated or for users who were not previously migrated to the client environment will not be migrated.
 English
 Español