Get to know the Management Dashboard
The settings described here are available from the menu screensManagement Panel > Settings.
What you can do with these settings:
Role management
About role management
- A role is synonymous withuser profile;
- The papergroups a set of features;
- The role defines the right to access functionalities and the information viewed by the user.
- After the user signs in, the access definition process defines what the he or she can do in the Management Dashboard and other modules.
Register roles that will be used by the Management Panel
Menu:Management Panel > Settings > Role Management
The Management Dashboard and other modules have the following types of fixed roles:
Acessa as funcionalidades de gerenciamento de papéis e realiza as configurações gerais. Este papel é definido pela organização no processo de implantação, mas posteriormente outros administradores podem ser adicionados. It can be changed according to the responsibility in the organization.
Note
Caso o papel de Administrador seja excluído indevidamente, torna-se necessário executar o fluxo Administrador do HCM, no Integrador HCM. Executando esse fluxo, o sistema irá recriar um Administrador e vincular o respectivo Colaborador ao papel.
Acessa as funcionalidades relacionadas ao seu perfil pessoal e profissional. This role is defined by the job positions hierarchy.
Acessa as funcionalidades de acompanhamento da sua equipe. This role is defined by the job positions hierarchy based on his or her hierarchy level. Examples: Director, Manager or Coordinator. O cadastro dos níveis informados nos postos de trabalho é feito no módulo Administração de Pessoal em Tabelas > Postos de Trabalho > Hierarquia > Níveis de Hierarquia (FR017NHP).
Observação
Quando um posto de trabalho possui algum nível de hierarquia definido em sua característica, e esse nível está definido em um papel de Gestor criado manualmente na administração de papéis do Painel de Gestão, o Colaborador não será sincronizado com o papel de Gestor padrão, mas sim, com o papel padrão do tipo Gestor vinculado ao nível de hierarquia definido.
Acessa as funcionalidades dos processos relacionados ao Painel de Gestão e demais módulos. This role is defined by the Administrator and can be changed according to the person's responsibilities in the organization. Example: Training evaluator (HR) or Evaluator, Evaluation coordinator (HR) or Coordinator;
Note
As configurações dos papéis são únicas para todos os usuários que estiverem associados a eles. Portanto, não é possível fazer a distinção de papéis entre empresas.
Por exemplo: se os colaboradores de duas empresas distintas estiverem associados a um determinado papel de Colaborador, não é possível habilitar as funcionalidades de Feedback para os colaboradores de uma empresa e desabilitar para a outra.
No campo Abrangência de filiais/Abrangência de empresas é possível selecionar uma ou mais Empresas ou Filiais, as quais o papel de RH poderá acessar as informações dos colaboradores. O papel de RH somente poderá visualizar as informações dos colaboradores das Empresas ou Filiais selecionadas neste campo.
Atenção
Para que essa busca seja realizada de forma eficaz, verifique se o nome da Empresa e o campo Apelido do módulo Administração de Pessoal são os mesmos. Caso contrário, é necessário pesquisar pelo Apelido.
O Tipo de abrangência é definido nas Configurações gerais. Se alterado, as configurações de abrangências feitas no processo de Administração de papéis são perdidas e o RH conseguirá visualizar as informações de todas as empresas ou filiais até que seja feita uma nova definição.
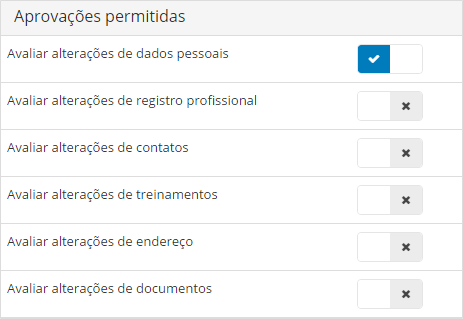
Para os papéis definidos como RH, devem ser indicados os itens que este pode aprovar no processo de atualização cadastral:
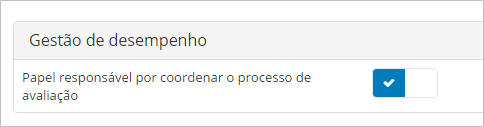
The roles responsible for coordinating the competence evaluation and the results evaluation processes must also be defined. This indication defines the people in charge who will receive a notification when an evaluator is laid off
Note
Visando otimizar a gestão, um colaborador demitido continuará aparecendo na tela Administração de papéis. Esse colaborador, entretanto, não tem poder de ação sobre o sistema - constando apenas para que o gerenciador tenha ciência de quem possuía e quem receberá as permissões.
Após definir todos os papéis que irão acessar o módulo, é necessário que eles sejam associados aos respectivos colaboradores da organização. Para fazer isso, faça este procedimento:
- Entre em Adicionar.
- Informe o Nome definido para cada tipo de papel.
- For HR roles, enter the names of the companies from which the role can view information, in Companies range. Esta abrangência determina os resultados apresentados nos filtros padrão e nos Grupos de Pessoas.
- Select the functionalities that will be allowed, according to the responsibilities of the role.
Depois que os papéis forem definidos, as permissões de acesso aos recursos devem ser configuradas na gestão de papéis da plataforma senior X, em Tecnologia > Administração > Autorização > Gestão dos papéis.
Note
- Os tipos de papel criados por padrão pelo Painel de Gestão não podem ser alterados;
- Na tela de Administração de papéis, o botão para excluir os Papéis cadastrados não ficará disponível caso haja um hyperlink vinculado ao papel em questão. Para remover este papel, portanto, o hyperlink deve ser alterado ou removido.
Register updates
Menu:Management Panel > Settings > Registration Updates
Pelo menu de Atualizações cadastrais, você pode configurar se é obrigatório anexar comprovantes dos dados atualizados nos perfis. Isso é feito na tela de Configuração da atualização cadastral, em Painel de Gestão > Configurações > Atualizações cadastrais.
Todas as funcionalidades são configuradas de acordo com as definições de cada empresa, para os dados abaixo:
- Endereços pessoais
- Contatos
- Ficha familiar
- Documentos
- Formações acadêmicas
- Treinamentos
- Dados pessoais
- Certificações profissionais
- Registros profissionais
- Habilidades
Observação
Quando o usuário alterar o campo de Raça e cor, presente no item de Dados pessoais, o sistema não irá obrigar a informar o comprovante, independente de qualquer configuração.
Para os demais campos do item de Dados pessoais, a obrigação de comprovantes permanece a mesma. Caso o usuário altere qualquer outro campo (Estado civil, por exemplo) e, também, o campo de Raça e cor, o botão de Salvar e enviar apenas irá ficar habilitado quando for inserido um comprovante, já que para o campo Estado civil, o comprovante torna-se necessário.
Se quiser, a empresa pode configurar para que os colaboradores não possam fazer a edição dessas informações. Porém, o bloqueio é aplicado para a atualização cadastral de todos os dados acima.
Somente o campo Permitir manter e-mail profissional permite que o bloqueio seja configurado pelo Administrador, pela tela de configurações gerais.
Para os outros campos, caso queira bloquear a atualização cadastral apenas de dados específicos, a empresa precisa abrir um chamado fazendo a solicitação para a equipe de Suporte da Senior.
Configure hyperlink
Menu:Management Panel > Settings > Configure hyperlink
The Configure Hyperlink featureno is available for the Management Panel of the People Management package | HCM GO UP. Know more.
Provide a hyperlink that will be visible on the Home Panel of the indicated role (Employee, Manager, HR), facilitating access to any URL from the Management Panel.
The hyperlink can also lead to People Management | HCM (on-premise), as long as they are compatible with the execution via the Web 5.0 form of access.
Note
To use the hyperlinks configuration, you must also have made the integration configurations with other systems, in: Management Panel > Configurations >Integration with other systems.
Human Capital Management | HCM Reports
Prerequisite
The Management Dashboard user must have permission to execute the same reports of the Human Capital Management | HCM modules, as the system executes the report with the user (from SGU*) associated with the worker in the Management Dashboard. Therefore, this user must have permissions to access the module (Web) and execute the report.
Report icon
Select an icon that visually represents the report.
Note
Icons are provided by Font Awesome, and the system supports all icons up to version 4.7.0 of this toolkit.
URL Prefix
Determines the location where the hyperlink will be opened:
- New page: the URL will be opened in a new window or a new tab.
- Same page: the URL will be opened in the same window where the hyperlink was clicked.
- Specific frame (windowName): for this option to work, the name of the hyperlink destination frame must be provided, otherwise a new window will be opened when the link is accessed. The URL will be opened in the browsing context (frame) with the provided name, which may refer to a specific <iframe> window or a tab, for example.
Note
The specific frame option should only be used for links from the same domain as the senior X platform. External links or links that require authentication may have problems opening in some browsers.
Entry screen parameters
Variable parameters are texts between curly brackets that the system replaces with values when assembling the hyperlink:
You can use the following variable parameters:
| Parameter | Replace with |
|---|---|
| {NumEmp} | code of the worker's company |
| {TipCol} | type of the worker |
| {NumCad} | code of the worker |
| {IniMes} | beginning of the current month |
| {FimMes} | end of the current month |
dado_EAbrEmp={NumEmp}&dado_EAbrTcl={TipCol}&dado_EAbrCad={NumCad}
In the example above, the following fields of the entry screen are filled out:
- EAbrEmp, with the company of the worker corresponding to the active user;
- EAbrTcl, with the type of the worker corresponding to the active user;
- EAbrCad, with the ID number of the worker corresponding to the active user.
Other addresses
You can set links to external URLs, e.g., the institutional site of your company, or screens of the web 5.0 module.
In this case, the system calculates as follows:
|
|
To add URLs from Ponto Gestão, you must create them as follows:
|
|
In "servidor:54209/gestaoponto/" provide the Time Management server and in "com.senior.apuracao.recalculoApuracao", the screen that will be opened.
Note
Configuring the perspective= parameter is optional. If not configured, the main screen of the Time Management module will be opened.
You can also define the URL of the image that will be displayed or add an image file in the PNG or JPG format. You can then test the changes with the Test link feature, available at the left side of the screen.
Integration with other systems
Menu:Management Panel > Settings > Integration with other systems
Allows the Management Dashboard users to access another application without having to sign in again.
The configuration below isprerequisite to thehyperlink setting of People Management reports | HCM (on-premise):
- Enable the cryptography-integrated authentication in SeniorConfigCenter > Security options > Cryptography-integrated authentication.
- Fill in the address (URL) of the connector on the Management Panel > Settings > Integration with other systems screen.
ImportantThe connector address must useHTTPS (secure connection). The connector URL must use https, that is, Web 5.0 must have a valid digital certificate.
- Define whether the timezone is different from the Middleware server. If the timezone of the Worker's Middleware is different from the Web 5.0, the Middleware server time zone in minutes field must be configured, in minutes, in the Settings > Integrations screen.
Audit logs
Menu:Management Panel > Settings > Audit Logs
The auditing logs allow you to monitor all modifications made in the fields of the database tables.
This is an important feature to identify the date and origin of these modifications by auditing insertions, changes or deletions made in the database tables within a given period.
Prerequisites
- To use the auditing log, the user must be signed in to the solution at the senior X Platform.
- This feature must be enabled by Senior to become functional. To obtain it, contact the Tech Support.
Note
The auditing logs only track database changes executed after the date on which this feature was enabled. Furthermore, the audit logs monitor only the operations carried out by system users and disregard the operations originated by integrations.
Usage
After the requirements above are met, access this feature in Settings > Audit logs.
Select the period you want to consult and, if desired, define a specific table to monitor and click in Filter.
The log messages provide the following information:
- Name of who did the modification
- Name of the modified table
- Date of change
- Operation executed in the table (inclusion, deletion or change)
- Address of the log-generating API
- Changed fields
- Original and new values
General Defiições
Menu:Management Panel > Settings > General Options
Allows the user to choose how they want to use the following features:
Note
The system makes it possible to standardize the sending of notifications by e-mail to the company's users, through the flowSettings (send email notifications). For more information about this functionality, visit the documentation forMake sending email notifications default, present on theHCM Integrator.
Public profile
Menu:Management Panel > Settings > Public Profile
The Public Profile settings screen allows you to make the following settings for thepublic employee profiles:
- Default Visibility: Select which profile information will be visible to the entire organization and which will be private.
- User can change: Define which profile information can be changed by collaborators.
Note
When creating a new tenant, all privacy options will be asprivate by default.
Panels
Menu:Management Panel > Settings > Panels
On the Panels settings screen, it is possible to control the visibility of some information on the cards of theHCM Analytics.
The system administrator can configure these settings for the rolesHR,manager It iscollaborator.
Requirements for enabling and using the Dashboards setting
Note
Dashboards configuration is not required to use HCM Analytics. If this screen is not enabled, the dashboard definitions that you already have in your system will remain the same.
If you choose to use the Dashboards configuration screen, the tenant administrator — or a user with a similar role — needs to:
- Register user roles byrole management screen.
- Configure theAnalytics-specific permission features on the senior X platform.
- release thepermission feature
- below for the system administrator (or whoever is responsible for configuring this Dashboards visibility setting):
Admin - Settings - Dashboards (res://senior.com.br/hcm/management_panel/configuration/dashboardsManagement)
The resource above is responsible for enabling the configuration screen in the senior X Platform menu.
- below for the system administrator (or whoever is responsible for configuring this Dashboards visibility setting):
Settings available for each paper
| Configurations available for this paper | Analytics that have their visibility impacted by this setting |
|---|---|
| team performance | Analytics oforganization performance |
| main panel | Analytics oforganization overview |
| recruitment management | Analytics oforganization recruitment |
| Career and succession | Analytics ofOrganizational career and succession |
| Configurations available for this paper | Analytics that have their visibility impacted by this setting |
|---|---|
| main panel |
Analytics with data fromperformance,colleagues It's fromcorporate wall |
 English
 Español